Replacing an Outdoor Lamp Post: A Comprehensive Guide
Your outdoor lamp post is a crucial element of your home's exterior, providing illumination and enhancing the overall aesthetic. However, over time, wear and tear, harsh weather conditions, or accidents can damage or deteriorate your lamp post, necessitating replacement. Whether you're a seasoned DIY enthusiast or seeking professional assistance, this comprehensive guide will equip you with the essential knowledge and steps to successfully replace your outdoor lamp post.
1. Safety First: Plan and Prepare
Before embarking on the replacement process, safety should be your top priority. Ensure that the electricity to the lamp post is turned off at the circuit breaker or fuse box. If you're not comfortable working with electricity, it's advisable to enlist the help of a qualified electrician.
Additionally, gather the necessary tools and materials for the job. These typically include a shovel, screwdriver, pliers, wire cutters, electrical tape, a new lamp post, a concrete mix, and a level.
2. Dismantling the Old Lamp Post
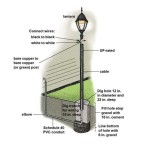
Begin by carefully digging around the base of the old lamp post to expose the concrete footing. Once the footing is visible, use a pry bar or shovel to loosen the concrete and detach the lamp post from the ground.
Next, locate the electrical wires connected to the lamp post. Using wire cutters, carefully cut the wires, leaving a few inches of exposed wire for reconnection later.
3. Preparing the New Lamp Post
Before installing the new lamp post, inspect it thoroughly to ensure it's in good condition and all the necessary parts are included. If the new lamp post comes with a separate base, attach it to the post according to the manufacturer's instructions.
Furthermore, apply a layer of sealant or primer to the base of the lamp post to protect it from corrosion and enhance its longevity.
4. Installing the New Lamp Post
Position the new lamp post in the hole where the old one was removed. Use a level to ensure the post is perfectly vertical. Then, mix the concrete according to the manufacturer's instructions and pour it into the hole around the base of the lamp post, filling it completely.
Allow the concrete to set and cure as per the recommended time indicated on the concrete mix packaging.
5. Reconnecting the Electrical Wiring
Once the concrete has hardened, you can proceed to reconnect the electrical wires. Match the colored wires of the new lamp post with the corresponding wires of the existing electrical supply. Typically, black is for live wire, white for neutral, and green or bare for ground wire.
Secure the connections with electrical tape and install a weatherproof electrical box to protect the connections from moisture and harsh weather conditions.
6. Finishing Touches and Testing
Finally, install the light fixture or lampshade onto the new lamp post and secure it according to the manufacturer's instructions. Turn on the electricity and test the functionality of the new lamp post to ensure it's working properly.
If you encounter any issues or uncertainties during the replacement process, it's advisable to consult with a qualified electrician for assistance.

How To Update Or Replace A Lamp Post And Light

How To Install Outdoor Lamp Post Easily Step By Gui

How To Install An Outdoor Lamp Post Light Fixture

Can You Replace Outdoor Lamp Post Fixture Industrial Lighting

How To Replace A Lamp Post Light Fixture Diy Quick And Easy

How To Replace An Electric Post Light With A Solar

How To Replace Most Lamp Post Light Bulbs Quick Easy

How To Replace An Existing Gas Lamp With A Solar Post Light Gamasonic Usa

Replace An Outdoor Lamp Post In 5 Steps Doityourself Com

Replacement Globes Mel Northey Co Inc
Related Posts


