Understanding Pull Cord Outdoor Lights: Wiring Diagrams and Installation
Pull cord outdoor lights, also known as pendant lights, are a popular choice for illuminating outdoor spaces. They offer a blend of functionality and aesthetics, providing a warm and inviting ambiance to patios, porches, and gardens. The unique pull cord mechanism makes them convenient to use and offers a classic appeal. Before embarking on installing these lights, understanding the wiring diagrams and proper installation procedures is essential. This guide provides a comprehensive overview of pull cord outdoor lighting, covering essential wiring concepts and safe installation techniques.
Key Components of a Pull Cord Outdoor Light
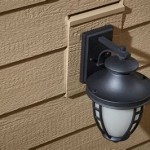
A typical pull cord outdoor light comprises several key components: * **Fixture:** This is the housing that holds the light bulb and the pull cord mechanism. It's usually made of durable materials like metal or waterproof plastic to withstand outdoor weather conditions. * **Pull Cord:** This is the mechanism that controls the light. Pulling the cord switches the light on or off. * **Light Bulb:** The type of bulb used will determine the light output and energy efficiency. Common options include incandescent, LED, and halogen bulbs. * **Wiring:** This includes the power cord that connects the fixture to the power source and internal wiring that connects the components within the fixture. * **Junction Box:** This is an enclosure used for connecting wires from the fixture to the power source. It should be weatherproof and designed for outdoor use. * **Grounding Wire:** This is an important safety feature that provides a path for electricity to safely flow to the ground in the event of a fault.
Wiring Diagrams and Installation Process
Understanding the wiring diagram is crucial for a safe and successful installation. Here's a step-by-step guide to installing a pull cord outdoor light: 1. **Prepare the Location:** Choose a location for the light fixture, ensuring it's in a suitable position for mounting and access to the power source. Consider factors such as height, clearance, and proximity to existing wiring. 2. **Locate the Power Source:** If a suitable outlet is not already available, you will need to run a new power cord to the location of the pull cord light. This may require hiring an electrician. 3. **Install the Junction Box:** Mount the junction box securely to the wall or another suitable surface. Ensure it is weatherproof and accessible for future maintenance. 4. **Run the Power Cord:** Feed the power cord from the outlet or junction box to the chosen location of the fixture. Use appropriate cable clamps to secure the cord and protect it from damage. 5. **Connect the Wires:** Connect the wires from the power cord to the wires within the fixture. The specific wiring configuration will be outlined in the fixture's instruction manual. 6. **Grounding:** Connect the grounding wire from the fixture to a grounding wire in the junction box. This is essential for safety. 7. **Install the Fixture:** Mount the fixture securely to the desired location using appropriate mounting hardware. 8. **Install the Light Bulb:** Carefully insert the correct type of light bulb into the fixture. 9. **Test the Light:** Turn on the power at the breaker box and test the light by pulling the cord.
Essential Safety Precautions
While installing pull cord outdoor lights, it's crucial to prioritize safety by following these precautions: * **Switch Off the Power:** Always turn off the power to the circuit at the breaker box before working on any electrical wiring. * **Use the Right Tools:** Use appropriate tools and equipment for the task. * **Properly Insulate Wires:** Always ensure that all wire connections are properly insulated to prevent electrical shocks. * **Inspect for Damage:** Inspect the wiring for damage or wear before and during installation. Replace any damaged wiring immediately. * **Grounding:** Never compromise on grounding. Ensure it's connected properly to prevent electrical hazards. * **Professional Assistance:** If you're unsure about any part of the installation process, seek professional assistance from a qualified electrician.
By understanding the wiring diagrams, following the proper installation procedures, and adhering to safety precautions, you can successfully install pull cord outdoor lights and enjoy the welcoming ambiance they contribute to your outdoor space.

Adding Light How To Install A Fixture Diy

Add A New Light Fixture Wiring Diagrams Do It Yourself Help Com

Wiring Diagram Adding An Outside Light Changing A 2 Gang For 3 Switch Connections Explained

Light Socket Diagram

Basic House Wiring

How To Install Outdoor Lighting And Diy Family Handyman

3 Way Switch Wiring Diagrams Do It Yourself Help Com

Rope Light Instructions Takethreelighting Com

Wiring Diagram Adding A Light But Why Use 3 Core And Cpc Cable Connections Explained

Basic House Wiring