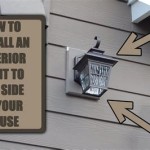
Essential Aspects of Philips LED Outdoor Wall Light Instructions
Philips LED outdoor wall lights are a great way to add style and function to your home's exterior. They are energy-efficient, durable, and easy to install. However, it is important to follow the instructions carefully to ensure that the lights are installed correctly and safely.
Before you begin, gather the following tools and materials:
- Philips LED outdoor wall light
- Screwdriver
- Drill
- Electrical tape
- Wire nuts
- Safety glasses
Step 1: Choose a location
The first step is to choose a location for your outdoor wall light. The light should be placed in an area where it will provide adequate lighting, such as near a doorway, garage, or patio. It is also important to make sure that the light is not placed too close to any flammable materials.
Step 2: Mark the mounting holes
Once you have chosen a location for the light, mark the mounting holes on the wall. Use a level to make sure that the holes are level. The screws for the mounting bracket will come through these holes.
Step 3: Drill the mounting holes
Drill the mounting holes using a drill bit that is slightly smaller than the screws. The holes should be deep enough so that the screws can be inserted all the way. Once the holes are drilled, insert the plastic anchors into the holes. These anchors will help to secure the mounting bracket to the wall.
Step 4: Mount the bracket
Place the mounting bracket over the mounting holes and insert the screws. Tighten the screws until the bracket is secure. Do not overtighten the screws, as this could damage the bracket.
Step 5: Connect the wires
Next, connect the wires from the light to the wires from the electrical box. Make sure that the black wire is connected to the black wire, the white wire is connected to the white wire, and the ground wire is connected to the ground wire. Twist the wires together and secure them with wire nuts. Wrap electrical tape around the wire nuts to insulate them.
Step 6: Install the light
Once the wires are connected, install the light onto the mounting bracket. The light should snap into place. Make sure that the light is secure before turning it on.
Step 7: Turn on the light
Finally, turn on the light to make sure that it is working properly. If the light does not turn on, check the connections to make sure that they are secure. If the light still does not turn on, contact a qualified electrician.
By following these instructions, you can safely and easily install your Philips LED outdoor wall light. Enjoy the added style and function that the light will bring to your home's exterior.

User Manual Philips Mygarden Robin English 8 Pages

Philips Arbour User Manual English 8 Pages

Hue Econic Outdoor Led Wall Light Philips Us

Mygarden Wall Light 153813116 Philips
.png?strip=all "Philips Bwc025 Led 730 T3 0 1w 10lm 3000k Warm White Ip44 Solar Outdoor Wall Light Kuala Lumpur Kl Selangor Malaysia Supply Supplies Distributor Jll Electrical Sdn Bhd")
Philips Bwc025 Led 730 T3 0 1w 10lm 3000k Warm White Ip44 Solar Outdoor Wall Light Kuala Lumpur Kl Selangor Malaysia Supply Supplies Distributor Jll Electrical Sdn Bhd

Hue Econic Outdoor Led Wall Light Philips Us

Hue Econic Outdoor Led Wall Light Up Lantern White And Colour Ambiance Philips Us

Philips Hue Outdoor Econic Light

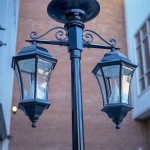
Philips Led Creek Wall Lantern With Motion Sensor White 1x60w 230v Diy At B Q

Hue Inara Outdoor Wall Light Black Lantern White Philips Us
Related Posts