Master the Art of Outdoor Light Timer Setup
Outdoor lighting plays a crucial role in enhancing the ambiance, safety, and security of our outdoor spaces. By incorporating an outdoor light timer into your setup, you can automate the illumination process, providing convenience and significant energy savings.
Setting up an outdoor light timer is a straightforward process that requires minimal technical expertise. Follow these essential steps to ensure your lights illuminate precisely when you need them.
1. Choose the Right Light Timer
Select a light timer designed for outdoor use. These timers are typically weather-resistant and can withstand extreme temperatures and moisture.
Consider the number of lights you want to control and the timer's amperage rating to ensure it can handle the electrical load.
2. Disconnect Power
Safety first! Disconnect the power supply to the outdoor light fixture before handling any electrical components.
3. Connect the Timer
Connect the light timer to the power source and then to the light fixture. Ensure the connections are secure and match the appropriate wire colors (black to black, white to white, green or bare to ground).
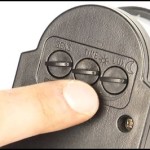
4. Set the Timer
Most timers feature a user-friendly interface with rotating dials or digital display. Set the desired on and off times by rotating the dials or pressing the relevant buttons.
If you encounter any difficulties, refer to the timer's user manual for detailed instructions.
5. Test the Setup
Once the timer is connected and programmed, reconnect the power supply and test the system.
Turn the timer to the "On" position manually to check if the lights illuminate. Simulate the scheduled time by adjusting the timer's dials to ensure the lights switch on and off automatically.
6. Adjust and Optimize
Fine-tune the timer settings as needed. Adjust the on and off times to suit your specific lighting requirements and daylight hours.
Monitor the lights regularly to ensure they are illuminating at the desired times. Make necessary adjustments to optimize their operation.
Additional Tips
- Use light sensors to automatically adjust the timer based on ambient light levels.
- Consider smart timers that can be controlled remotely via smartphone apps.
- Install the timer in a weather-protected location to ensure its longevity.
- Regularly inspect the timer and connections to prevent malfunctions.
Conclusion
By implementing these steps, you can effortlessly set up an outdoor light timer that will automate your lighting needs, saving you time, energy, and ultimately enhancing the enjoyment of your outdoor spaces.

How To Set A Plug Timer Mechanical Digital Switches

How To Set A Plug Timer Mechanical Digital Switches

3 Easy Ways To Use A Light Timer Wikihow

Programming Your Mechanical Timer

How To Use A Timer Switch For Lights

3 Easy Ways To Use A Light Timer Wikihow

How To Set An Intermatic Timer 12 Steps With Pictures Wikihow

Utilitech Outdoor Manual Timer Easy Setup

Easy To Install Programmable Timer The Lady Diy

How To Use A Timer Switch For Lights