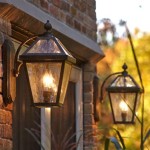
Mounting an Outdoor Light on a Brick Wall: An Essential Guide
Installing an outdoor light on a brick wall can dramatically enhance the aesthetics and safety of your property. However, improper mounting techniques can lead to structural damage or even pose a safety hazard. This comprehensive guide will provide you with essential steps to ensure a safe and secure installation.
### Tools and Materials Required- Outdoor light fixture
- Electrical drill and drill bit (masonry bit)
- Mounting screws or bolts
- Screwdriver
- Electrical tape
- Caulk
- Wire strippers
- Electrical wire nuts
Before starting the installation, determine the desired location of the light fixture. Ensure that it is in an accessible area and that the electrical wiring is accessible or can be run to the location. Mark the location on the brick wall using a pencil or chalk.
### Step 2: Drilling the Mounting HolesUse the electrical drill and masonry bit to drill the mounting holes into the brick wall. The depth of the holes should slightly exceed the length of the mounting screws or bolts. Clean any dust or debris from the holes.
### Step 3: Installing the Electrical Box (If Necessary)If the light fixture requires an electrical box, such as a junction box or outlet box, install it according to the manufacturer's instructions. Mount the box securely to the brick wall using the appropriate mounting hardware.
### Step 4: Wiring the Light FixtureConnect the electrical wires from the light fixture to the electrical wiring in the wall using electrical wire nuts. Ensure that the connections are tight and secure. Use electrical tape to insulate the connections.
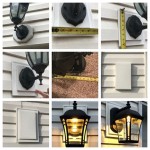
### Step 5: Mounting the Light FixtureAlign the light fixture with the mounting holes. Insert the mounting screws or bolts and tighten them securely using a screwdriver. Ensure that the light fixture is firmly attached to the brick wall.
### Step 6: Sealing the GapsTo prevent moisture from penetrating the mounting holes, apply a bead of caulk around the edges of the light fixture where it meets the brick wall. Smooth the caulk using a wet finger or caulk tool.
### Step 7: Testing the Light FixtureTurn on the power supply to the light fixture and ensure that it functions properly. Check for any loose connections or flickering. If any issues arise, immediately turn off the power and consult a qualified electrician.
### Additional Tips * Use stainless steel or galvanized screws or bolts to prevent rust. * For heavy light fixtures, consider using toggle bolts or butterfly anchors for added support. * If the brick wall is painted or finished, use painter's tape to protect the surface from damage during drilling. * Always follow the manufacturer's instructions for the light fixture and electrical wiring. * If you are not comfortable with electrical work, it is recommended to hire a qualified electrician for safe and professional installation.
Mounting Exterior Light Through Brick Wall

Installing Outdoor Light Into Brick Diy Home Improvement Forum

Adding A Sconce On Brick Wall Including How To Cut The

How To Install Outdoor Lights On Brick

7 Steps To Install Solar Lights On A Brick Wall Sresky

American Energy By James Dulley

Adding A Sconce On Brick Wall Including How To Cut The

Installing Outdoor Light Into Brick Diy Home Improvement Forum

How To Hang Lights On Brick

How To Position Outdoor Lights Digital Trends
Related Posts