Malibu Outdoor Light Timer Manual: A Comprehensive Guide
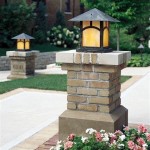
Outdoor lighting is a critical aspect of home security and aesthetics, enhancing curb appeal and providing illumination during nighttime hours. Malibu Outdoor Light Timers are designed to automate the process, ensuring your outdoor lights operate efficiently and effectively. This comprehensive manual will guide you through the installation, operation, and troubleshooting of your Malibu Outdoor Light Timer.
Understanding Malibu Outdoor Light Timers
Malibu Outdoor Light Timers are programmable devices that control the on/off times of your outdoor lights. They offer a range of features, including:
- Multiple Timer Settings: Create custom schedules for different days of the week, allowing you to adapt to your lighting needs.
- Dusk-to-Dawn Functionality: Utilize the built-in light sensor to automatically activate lights at dusk and deactivate them at dawn, providing a convenient and energy-saving solution.
- Manual Override: Maintain control over your lights with the option to override the timer's settings and activate or deactivate them manually.
- Weatherproof Design: Designed to withstand outdoor elements, Malibu Outdoor Light Timers are built to last.
Installing Your Malibu Outdoor Light Timer
Installing a Malibu Outdoor Light Timer is a straightforward process that can typically be completed by homeowners with basic electrical knowledge. The following steps outline the installation procedure:
- Disconnect Power: Before starting any electrical work, ensure the power is disconnected at the breaker box to prevent accidental shocks.
- Locate the Wiring: Identify the wires connected to your outdoor light fixture. These are usually black (hot), white (neutral), and ground (green or bare).
- Connect to the Timer: Connect the wires from the light fixture to the corresponding terminals on the timer. Refer to the timer's instruction manual for specific wiring diagrams.
- Mount the Timer: Secure the timer to a suitable location near the light fixture, ensuring it's accessible for adjustments and programming.
- Restore Power: Once the connections are made, restore power to the circuit and test the timer by manually activating and deactivating the lights.
Programming Your Malibu Outdoor Light Timer
Programming your Malibu Outdoor Light Timer allows you to customize the lighting schedule according to your preferences. The programming steps may vary slightly depending on the specific model, but generally involve the following:
- Access the Programming Mode: Locate the programming buttons on the timer and follow the instructions in the manual to enter the programming mode.
- Set the Time: Adjust the timer's clock to match the current time.
- Configure the On/Off Times: Set the desired on and off times for each day of the week. You can create separate schedules for weekdays and weekends.
- Adjust Settings (Optional): Depending on your timer's features, you can adjust additional settings, such as the dusk-to-dawn mode or manual override options.
- Save the Settings: Confirm the settings and exit the programming mode by following the timer's instructions.
Troubleshooting Common Issues
While Malibu Outdoor Light Timers are designed for reliability, occasionally you may encounter issues that require troubleshooting. Here are some common problems and their potential solutions:
- Lights Not Turning On: Check the power supply, ensuring the breaker is switched on. Verify that the timer is properly connected and that the wiring is secure.
- Lights Not Turning Off: Examine the timer settings, ensuring the programmed off times are correct. Check for any loose connections or faulty wiring.
- Timer Not Responding: Replace the timer's batteries if it's battery-powered. If the issue persists, ensure the power supply is functioning correctly and check for any damage to the timer.
- Dusk-to-Dawn Mode Malfunction: Clean the light sensor on the timer, as dust or debris can affect its performance. Ensure the sensor is positioned correctly and not obstructed by any objects.
It's important to consult the specific instruction manual for your Malibu Outdoor Light Timer model for detailed information and troubleshooting steps. In the case of persistent issues, it's advisable to seek professional assistance from a qualified electrician.

Instruction Manual For Malibu 300 Watt Transformer Falling Water

Instruction Manual For Malibu 300 Watt Transformer Falling Water

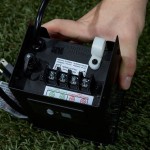
Malibu Boats Ml121rt Power Pack Instructions Manualslib

Ml100thb Malibu 100w Electronic Power Pack

Malibu Power Pack 200watt Low Voltage Weatherproof Transformer With Ph Venus Manufacturing

Free Ship Malibu Intermatic Lv365t 44 Watt Low Voltage Light Transformer Timer

Intermatic Timer

Malibu Low Voltage Transformer Installation Troubleshooting 2024

How To Set The Timer On Intermatic Malibu Landscape Lighting Hunker

Smarthome S Malibu Ml121rt 121 Watt Power Pack
Related Posts