Low Voltage Outdoor Lighting Diagram: A Guide to Understanding the Setup
Outdoor lighting is essential for enhancing the beauty and functionality of any property. Low voltage outdoor lighting has become increasingly popular due to its energy efficiency, safety, and versatility. Understanding the components and setup of a low voltage outdoor lighting system is crucial for proper installation and maintenance. This article will provide a comprehensive guide to low voltage outdoor lighting diagrams, explaining the different elements and their roles in creating a functional and aesthetically pleasing lighting scheme.
Understanding the Basics of Low Voltage Outdoor Lighting
Low voltage outdoor lighting systems utilize electricity at a lower voltage than standard household wiring, typically ranging from 12 to 24 volts. This lower voltage offers several advantages:
-
Safety:
Low voltage is safer to work with, reducing the risk of electrical shocks. -
Energy Efficiency:
Lower voltage leads to less energy loss, resulting in reduced energy consumption and lower electricity bills. -
Flexibility:
The use of lower voltage allows for a wider range of lighting fixtures, including smaller and more intricate designs.
A typical low voltage outdoor lighting system consists of several key components:
-
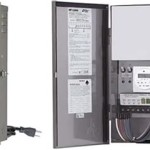
Transformer:
The transformer is the heart of the system, converting standard household voltage (120 volts) to low voltage (12-24 volts). It is usually placed indoors or in a weatherproof enclosure outdoors. -
Wiring:
Low voltage wiring is typically made of insulated copper cable, often referred to as "landscape wiring". It's designed for outdoor use and is resistant to weather elements. -
Lighting Fixtures:
These come in various styles and designs, including path lights, spotlights, well lights, and string lights. -
Control Devices:
These allow for customizing light settings, such as timers, dimmers, and motion sensors.
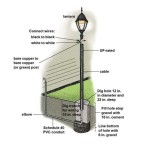
The installation of a low voltage outdoor lighting system typically begins with the transformer. The transformer is connected to the main power supply, and the low voltage wiring is then run from the transformer to the lighting fixtures. Each fixture is connected to the wiring using waterproof connectors. Control devices, such as timers, are usually wired into the system at the transformer or near the fixtures they control.
Components and their Functions in a Low Voltage Outdoor Lighting Diagram
Low voltage outdoor lighting diagrams provide a visual representation of the system's components and their connections. These diagrams are essential for proper installation and troubleshooting:
-
Transformer:
The transformer is represented by a symbol resembling a coil with an arrow pointing to the output voltage. -
Wiring:
The wiring is depicted as lines connecting the transformer to the fixtures. -
Lighting Fixtures:
Each fixture is represented by a symbol indicating its type (e.g., path light, spotlight). -
Control Devices:
Timers, dimmers, and motion sensors are depicted with specialized symbols representing their functionality.
The diagram also includes labeling for key elements, such as the transformer's output voltage, wire gauge, and fixture types. This information is essential for understanding the system's parameters and choosing appropriate components.
Types of Low Voltage Outdoor Lighting Diagrams
Low voltage outdoor lighting diagrams come in various forms, tailored to different needs:
-
Schematic Diagrams:
These diagrams use standardized symbols to represent each component and their interconnections. They provide a comprehensive overview of the system's layout and wiring pathways. -
Wiring Diagrams:
These diagrams show the specific wiring connections between components, including wire types, colors, and lengths. They are essential for accurate installation and troubleshooting. -
Layout Diagrams:
These diagrams illustrate the placement of lighting fixtures in relation to the property's features, such as walkways, landscaping, and architectural elements. They help visualize the lighting scheme and ensure proper placement for aesthetic and functional purposes.
It's important to use the appropriate diagram for the specific task at hand. For instance, a schematic diagram is useful for initial planning and understanding the system's overall design, while a wiring diagram is essential for actual installation. Layout diagrams help visualize the lighting placement and ensure optimal results.
Low voltage outdoor lighting diagrams serve as invaluable tools for understanding and implementing a well-designed and functional lighting system. By understanding the components and their interconnections, individuals can ensure a smooth installation and enjoy the benefits of energy-efficient and aesthetically pleasing outdoor lighting.

How To Install Low Voltage Outdoor Landscape Lighting The Garden Glove

How To Install Low Voltage Outdoor Deck Lighting

Wiring Installation Coastal Source

How To Wire Outdoor Low Voltage Lighting Part 2

Low Voltage System Layout Landscape Lighting Supply Company

How To Wire Outdoor Low Voltage Lighting Part 3

Make Your Backyard Badass With Led Lighting The Art Of Doing Stuff

What Size Landscape Lighting Transformer To Use Power Your Design Garden Light Led

How To Design Your 12 Volt Outdoor Lighting System Low Voltage Landscape

What Size Landscape Lighting Transformer To Use Power Your Design Garden Light Led
Related Posts