Installing a Timer for Outdoor Lights: A Comprehensive Guide
Outdoor lighting enhances security, extends usable hours in the evening, and creates a welcoming ambiance. To optimize these benefits, an automatic outdoor light timer is an essential tool. Installing a timer ensures your lights turn on and off at predetermined times, eliminating the need for manual operation while providing convenience and energy savings.
Choosing the Right Timer
The type of timer you choose depends on your specific needs. Consider these factors:
- Number of lights to be controlled: Timers vary in the number of lights they can handle.
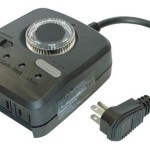
- Type of timer: Mechanical, digital, or astronomical timers offer different features and ease of use.
- Durability and weather resistance: Outdoor timers should be designed to withstand harsh weather conditions.
Step-by-Step Installation Instructions
1. Safety First
Before starting any electrical work, turn off the power to the outdoor circuit at the circuit breaker or fuse box. Ensure all wires are de-energized.
2. Determine Wire Connections
Identify the wires that need to be connected to the timer. Typically, the black wire is "hot" (power in), the white wire is "neutral" (power out), and the green or bare wire is "ground." Refer to the timer manufacturer's instructions for specific wire designations.
3. Mount the Timer
Choose a suitable location for the timer, ideally near the electrical source. Mark and drill holes for mounting according to the manufacturer's instructions.
4. Connect the Wires
Connect the wires to the corresponding terminals on the timer. Use wire nuts or terminal connectors to secure the connections and insulate them with electrical tape. Ensure all connections are tight and secure.
5. Program the Timer
Turn on the power at the circuit breaker or fuse box. Program the timer according to the desired on and off times. Refer to the timer's instructions for specific programming details.
6. Test the System
Once the timer is programmed, test the installation by manually turning it on and off. Observe if the lights respond correctly to the timer settings.
Benefits of a Timer for Outdoor Lights
Installing a timer for outdoor lights offers numerous benefits, including:
- Convenience: Automatic on/off operation eliminates the hassle of manually turning lights on and off.
- Energy savings: Timers prevent lights from staying on unnecessarily, reducing energy consumption.
- Enhanced security: Well-lit areas around the home deter potential intruders.
- Extended outdoor hours: Automatic lighting allows for extended use of outdoor spaces even after sunset.
Conclusion
Installing a timer for outdoor lights is a practical and beneficial project that enhances the safety, convenience, and aesthetics of your outdoor space. By following these steps and choosing the right timer, you can ensure your outdoor lights operate efficiently and according to your schedule, providing peace of mind and energy savings for years to come.

Easy To Install Programmable Timer The Lady Diy
Wiring A Honeywell 3 Way Timer Switch Stephen Ostermiller

How To Put Outdoor Lights On A Timer Electronicshub

How To Use Outdoor Mechanical Timer 3 Diffe Ways

3 Remarkably Easy Solutions For An Automatic Porch Light Timer

How To Use A Timer Switch For Lights

Diy With Style Let There Be Porch Light Blue I

I Am To Be Wiring A Woods Indoor Outdoor Time Switch Multi Volt Model 59396 59399 30 Automatically Turn On

Our Home From Scratch

3 Easy Automatic Porch Light Timers


