Installing Low Voltage LED Outdoor Lighting
Low voltage LED outdoor lighting offers a visually appealing and energy-efficient solution for illuminating your outdoor spaces. Installing low voltage LED outdoor lighting can enhance the beauty and functionality of your landscape, create a welcoming ambiance, and improve safety and security. While the installation process may appear daunting, it is a manageable task for those with basic electrical knowledge and DIY skills.
Step 1: Planning and Preparation
Before embarking on the installation, it is crucial to plan and gather the necessary materials. This step involves assessing the desired lighting layout, calculating the required number of lights, considering the power source, and purchasing suitable components.
Determining Lighting Layout
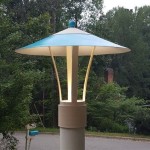
Start by envisioning the desired lighting effects and functionality. Determine the areas you wish to illuminate, such as pathways, gardens, patios, or architectural features. Consider the type of light needed, whether it is ambient for overall illumination or accent lighting to highlight specific elements.
Calculating Lighting Requirements
Once the lighting layout is established, calculate the number of lights required. Consider the size of the area, the desired brightness level, and the spacing between fixtures. Refer to the manufacturers' specifications for individual lights to determine their light output and coverage area.
Choosing a Power Source
Low voltage outdoor lighting systems typically operate on 12-volt power. The power source is essential, and it can be either a transformer or a dedicated circuit. Transformers convert household voltage to low voltage and are often preferred for their ease of installation. Dedicated circuits require electricians to install a new electrical outlet specifically for the lighting system.
Gathering Materials and Tools
After planning and determining the power source, gather the necessary materials. These include:
- Low voltage LED outdoor lights (consider various styles and sizes)
- Transformer (if not using a dedicated circuit)
- Low voltage wire (usually 14 or 16 gauge)
- Wire connectors (appropriate for the wire gauge)
- Staple gun or wire clips for securing wires
- Wire strippers
- Screwdrivers (Phillips and flathead)
- Tape measure
- Level
- Safety glasses and gloves
Step 2: Installing the Transformer
The transformer is the heart of a low voltage lighting system, converting household voltage to the safe low voltage required for the lights. Installing the transformer is a crucial step and should be performed carefully.
Choosing a Location
Select a suitable location for the transformer, ensuring it is protected from the elements and easily accessible. Avoid placing it directly on the ground. Consider installing it in a sheltered location like an attic, basement, or garage. If outdoor installation is necessary, choose a location with minimal exposure to the elements.
Installing the Transformer
Follow the manufacturer's instructions for installing the transformer. Typically, the transformer is mounted to a wall or surface using screws or clips. Connect the transformer to an existing electrical outlet or dedicated circuit. Ensure that the electrical connection is secure and that there is adequate grounding.
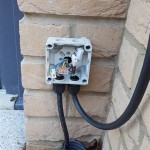
Step 3: Running the Wiring
Running the wiring is a crucial step that connects the lights to the transformer. This involves carefully laying the low voltage wire and securing it along the desired paths. Consider using underground conduit or wire for greater protection and durability.
Planning the Wire Routes
Before laying the wire, plan the routes, ensuring they are concealed or unobtrusive. Utilize existing pathways, landscaping features, or concealed spaces along walls or fences.
Securing the Wiring
After laying the wire, securely fasten it to a stable surface. Use wire clips, staple guns, or cable ties. Make sure the wire is not exposed to sharp edges or potential damage.
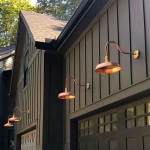
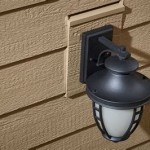
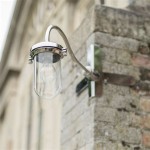
Step 4: Installing the Lights
The final step is to install the lights according to the chosen layout and connect them to the wiring. This involves mounting the lights, connecting the wiring, and testing the system for proper functionality.
Mounting the Lights
Mount the lights at the desired locations, ensuring they are level and secure. Be sure to consult the manufacturer's instructions for specific mounting techniques. Use appropriate hardware for the surfaces being mounted.
Connecting the Wiring
Connect the wires to the lights, ensuring proper polarity. The wire will typically have two conductors: a black conductor (positive) and a white conductor (negative). Follow the manufacturer's instructions for wire connections.
Testing the System
After installing all lights and making the connections, test the entire system to ensure proper functionality. Turn on the power to the transformer, and examine each light fixture to verify they are working correctly and providing the desired brightness level. If any issues arise, troubleshoot the connections carefully.

Reasons To Install Low Voltage Led Lights In Landscape Architecture

How To Install Outdoor Low Voltage Led Step Lights Mullan Lighting

How To Install Outdoor Low Voltage Led Step Lights

Georgeswork A Very Bright 1 Watt Diy Led Garden Light

Install Low Voltage Outdoor Lighting And Create A Welcoming Glow Digging

How To Install Low Voltage Landscape Lighting Home Construction Improvement

Landscape Lighting Installation In Wichita Low Voltage Led

Things To Know Before Starting Outdoor Lighting Installation

How To Easily Install Low Voltage Landscape Lighting

Low Voltage System Layout Landscape Lighting Supply Company
Related Posts