Essential Aspects of Installing an Outdoor Light Switch
Adding an outdoor light switch is a practical and aesthetically pleasing enhancement to any home exterior. Whether you seek to illuminate a pathway, highlight architectural details, or enhance security, understanding the essential aspects of the installation process is crucial. Here's a comprehensive guide to help you navigate this project efficiently and safely.
Planning and Safety Precautions
1.
Determine Location:
Choose a suitable location for the switch that provides convenient access and aligns with the intended lighting scheme. Consider factors such as distance from the power source, visibility, and proximity to outdoor structures or fixtures. 2.Gather Materials:
Acquire necessary materials, including the light switch, electrical wires (gauge determined by amperage), conduit (to protect wires), junction box, screws, and electrical tape. 3.Safety First:
Turn off the power at the electrical panel before commencing any work. Ensure that all circuits are de-energized using a voltage tester. 4.Electrical Codes:
Adhere to local electrical codes and consult with a qualified electrician if necessary. Improper installation can pose electrical hazards and void warranties.Installation Steps
1.
Install Junction Box:
Mount a weatherproof junction box at the chosen location, following the manufacturer's instructions. Secure it firmly to the exterior wall using appropriate screws. 2.Run Conduit:
Connect the junction box to the power source using electrical conduit. Ensure the conduit is securely fastened to the wall or structure to prevent damage or movement. 3.Pull Wires:
Run the electrical wires through the conduit, ensuring they have sufficient length to reach the switch and power source. Strip the wire ends and prepare them for connections. 4.Connect Switch:
Locate the terminals on the light switch and connect the wires according to the manufacturer's instructions. Typically, black wires are for power, white for neutral, and green or bare wire for grounding. 5.Secure Connections:
Tighten all electrical connections securely using a screwdriver. Wrap electrical tape around each connection to prevent shorts or loosening. 6.Mount Switch:
Install the switch into the junction box and secure it with the provided screws. Make sure the switch is flush against the wall and operates smoothly.Testing and Troubleshooting
1.
Power On:
Restore power at the electrical panel and test the switch by flipping it on and off. 2.Test Light Fixture:
Confirm that the connected light fixture is functioning correctly by turning it on and off. 3.Troubleshooting:
If the switch or light fixture is not working, check for loose connections, damaged wires, or a faulty switch. Refer to the manufacturer's instructions for specific troubleshooting tips and consider seeking professional assistance if needed.Additional Tips
1.
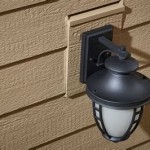
Weather Resistance:
Select a light switch and junction box with appropriate weather resistance ratings to withstand outdoor conditions. 2.Choose the Right Switch:
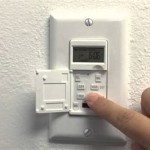
Consider the type of light fixture you plan to connect, as switches may have specific wattage or amperage limitations. 3.Consider a Timer:
For added convenience and energy efficiency, install a light switch with a built-in timer to automate lighting schedules. 4.Seek Professional Help:
If you are unsure about any aspect of the installation, do not hesitate to consult a qualified electrician to ensure safety and proper functionality.By following these essential aspects, you can successfully install an outdoor light switch and enhance the aesthetics and functionality of your home exterior. Remember to prioritize safety, adhere to electrical codes, and seek professional guidance when necessary. With proper planning and execution, you can enjoy the benefits of outdoor lighting without compromising safety or convenience.

Tutorial Outdoor Light Switch Installation Crafting Is My Therapy

Nec Code On Weather Proof Switches Complete Install 32

Adding An Extra Light From A Switch

How To Install A One Way Light Switch Socketsandswitches Com

Electrical Help How To Install A Light Switch Outside

How To Install A Two Way Light Switch Socketsandswitches Com

How To Wire A Light Switch Downlights Co

Adding An Extra Light From A Switch

5 Tips For Installing An Outdoor Light Switch Doityourself Com

How To Install A One Way Light Switch Socketsandswitches Com