Installing Outdoor Lighting Conduit: A Comprehensive Guide
Outdoor lighting enhances the aesthetics and security of any property. To ensure a safe and functional lighting system, proper conduit installation is crucial. Conduit serves as a protective housing for electrical wiring, shielding it from the elements and potential damage. This guide provides a comprehensive overview of installing outdoor lighting conduit, covering essential considerations, tools, and step-by-step instructions.
1. Planning and Preparation
Before embarking on conduit installation, meticulous planning is paramount. This involves assessing the lighting requirements, determining the conduit routing, and gathering the necessary materials.
a. Lighting Requirements
Identify the specific areas to be illuminated and the type of lighting fixtures desired. Consider factors like brightness, color temperature, and the number of fixtures. This will help determine the appropriate gauge of wiring and the size of conduit needed.
b. Conduit Routing
Plan the path of the conduit, taking into account existing structures, landscaping, and accessibility for future maintenance. Consider using a conduit bender to create smooth curves and minimize sharp bends, which can restrict wire pull-through. It is essential to bury the conduit at a depth of at least 18 inches to protect it from damage and frost heave.
c. Material Selection
Choose the appropriate type of conduit based on the project requirements. PVC (polyvinyl chloride) conduit is commonly used for outdoor lighting due to its durability, affordability, and resistance to corrosion. Metal conduit, such as galvanized steel or aluminum, offers greater strength and fire resistance. Select the appropriate diameter based on the number and size of wires to be installed.
2. Tools and Equipment
Installing outdoor lighting conduit requires a range of tools and equipment for efficient execution. Ensure the following items are readily available:
a. Conduit Bender
A conduit bender is essential for creating smooth curves in the conduit, facilitating wire pulling. Choose a bender that is compatible with the size of the conduit being used.
b. Conduit Cutter
A conduit cutter makes precise cuts without crushing or damaging the conduit. Select a cutter that is capable of cutting the desired conduit size.
c. Wire Stripper
A wire stripper removes insulation from the ends of wires, preparing them for connections. Choose a stripper with adjustable settings for different wire gauges.
d. Wire Connectors
Wire connectors, also known as wire nuts, secure wire connections. Choose connectors that are compatible with the wire gauge and the number of wires being connected.
e. Screwdriver
A screwdriver is required for attaching conduit fittings and mounting boxes.
f. Level
A level ensures that conduit sections are installed horizontally or vertically, maintaining consistency and aesthetic appeal.
3. Step-by-Step Installation
Once the necessary tools and materials are gathered, follow these step-by-step instructions to install outdoor lighting conduit:
a. Trenching
Dig a trench at least 18 inches deep along the planned conduit route. Use a shovel or trencher to create a trench that is wide enough to accommodate the conduit and provides adequate clearance for future maintenance.
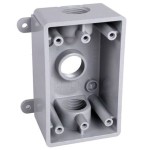
b. Conduit Fittings
Install conduit fittings at all points where the conduit changes direction or connects to fixtures. Fittings include elbows, tees, and couplings, ensuring smooth transitions and secure connections.
c. Conduit Installation
Install the conduit sections into the trench, securing them with conduit clips or straps at regular intervals. Ensure that the conduit is properly supported and free from sagging. Use a level to ensure the conduit is installed horizontally or vertically, as required.
d. Wire Pulling
Once the conduit is installed, pull the electrical wires through the conduit using a wire puller. Carefully guide the wires through the conduit, avoiding sharp bends or kinks that could damage the wires or restrict current flow.
e. Fixture Installation
Mount the lighting fixtures on the designated locations, connecting the wires to the fixtures using wire connectors. Ensure that all connections are properly secured and insulated.
Installing outdoor lighting conduit requires meticulous planning, appropriate tools, and a thorough understanding of electrical safety practices. By following these guidelines, you can ensure a safe and functional outdoor lighting system that enhances the aesthetics and security of your property.

How To Install A Yard Light Post Electrical Projects Outdoor Lamp Posts Home Wiring

How To Install Outdoor Lighting And Solar Lights Garden

American Energy By James Dulley

Your 4 Step Conduit Guide Jim Lawrence Blog

Install Landscape Lighting For Added Curb Appeal

How To Install Flood Lights With Pictures Wikihow

Outdoor Low Voltage Lighting Diy Family Handyman

How To Install Outdoor Lighting And Diy Family Handyman

Wiring Installation Coastal Source

Running Power To An Outbuilding Fine Homebuilding