Install Outdoor Light Box: Essential Aspects
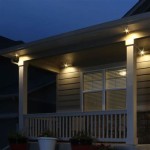
Installing outdoor light boxes can significantly enhance the safety, aesthetics, and overall appeal of your outdoor space. Whether you're illuminating a pathway, showcasing artwork, or deterring intruders, understanding the essential aspects of this process is paramount. This article will guide you through the crucial steps involved in installing outdoor light boxes efficiently and effectively.
Step 1: Site Selection and Planning
The first step is to determine the optimal location for your light box. Consider the intended purpose, available lighting conditions, and aesthetic factors. Plan the wiring route and ensure access to a power source. It's advisable to draw a sketch of the layout to visualize the design and identify potential obstacles.
Step 2: Preparation and Foundation
Prepare the installation site by removing any obstructions or irregularities. If the light box requires a mounting surface, build a sturdy platform or wall bracket that meets the manufacturer's specifications. Consider using weather-resistant materials like concrete, brick, or treated wood to ensure longevity.
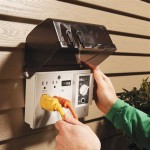
Step 3: Wiring and Electrical Connections
Cable selection and wiring should adhere to electrical codes and safety standards. Use appropriate weatherproof wires and connectors suitable for outdoor environments. Connect the wires to the light box terminals following the manufacturer's instructions. Ensure secure connections and insulation before powering the system.
Step 4: Mounting the Light Box
Handle the light box with care and position it correctly on the mounting surface. Secure the box using the provided hardware, such as screws, bolts, or brackets. Ensure the light box is level and firmly attached to prevent movement or damage.
Step 5: Bulb Selection and Installation
Choose appropriate light bulbs based on the fixture's requirements and the desired illumination level. Consider factors such as wattage, color temperature, and beam angle. Install the bulbs carefully and ensure a snug fit to prevent moisture ingress.
Step 6: Finishing Touches and Maintenance
After installation, inspect the light box thoroughly and make any necessary adjustments. Ensure the lenses are clean and free of debris. Regularly inspect and clean the fixture to maintain its functionality and appearance. Replace bulbs as recommended by the manufacturer to sustain optimal illumination.
Additional Tips:
- Consider using LED bulbs for energy efficiency and extended lifespan.
- Install motion sensors or timers to automate lighting and reduce energy consumption.
- Utilize weather-resistant caulk or gaskets to prevent moisture penetration.
- Avoid using high-wattage bulbs that may overheat the fixture or cause harm.
- If you encounter any difficulties, consult a qualified electrician for assistance.

How To Install An Exterior Electrical Box For A Light Fixture On The Wood Siding

Replacing An Outdoor Light Fixture

How To Install A Porch Light Exterior Fixtures Lighting

How To Replace An Outdoor Light

Replacing An Outdoor Light Fixture

How To Install An Exterior Electrical Box For A Light Fixture On The Wood Siding

How To Install Outdoor Lighting And Diy Family Handyman

Outdoor Light W No Junction Box Lighting Ceiling Exhaust Fan

How To Easily Install Landscape Lighting With No Tools

How To Install A Flood Light The Home Depot