Essential Aspects of Installing a New Outdoor Flood Light
Ensuring the safety and well-being of your outdoor spaces is paramount. A meticulously planned and executed outdoor lighting setup can provide ample illumination, deter intruders, and enhance the aesthetic appeal of your property. Among the various outdoor lighting options, flood lights stand out as a versatile and effective solution for illuminating large areas.
Before embarking on the installation journey, it is essential to familiarize yourself with the crucial aspects of the process. These elements play a pivotal role in ensuring that your flood light installation is not only functional but also aesthetically pleasing, long-lasting, and compliant with electrical codes.
In this comprehensive guide, we will delve into the essential considerations for installing a new outdoor flood light, providing valuable insights to guide you through each step of the process.
1. Choosing the Right Location
The first and foremost step is to carefully select the location for your outdoor flood light. Consider the areas that require the most illumination, such as entrances, patios, and walkways. Ensure that the chosen location provides a clear line of sight to the area to be illuminated and minimizes glare for neighboring properties.
2. Selecting the Appropriate Fixture
Next, you need to select the flood light fixture that best meets your specific needs. Factors to consider include the wattage, beam angle, color temperature, and material durability. Choose a fixture with a wattage that provides sufficient illumination for the intended area. The beam angle should be tailored to the size and shape of the area to be illuminated. Color temperature refers to the warmth or coolness of the light emitted, and you should select one that complements the ambiance you desire. Finally, opt for a fixture made from durable materials that can withstand outdoor conditions.
3. Electrical Wiring and Safety
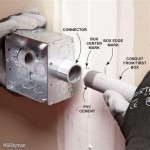
Proper electrical wiring is crucial for the safe and reliable operation of your flood light. Hire a qualified electrician to ensure that the wiring is in compliance with electrical codes and that all necessary safety measures are taken. Use appropriate gauge wire and secure all connections with wire nuts or terminals.
4. Mounting the Fixture
Follow the manufacturer's instructions carefully when mounting the flood light fixture. Use the provided hardware and ensure that the fixture is securely attached to the mounting surface. If mounting on a siding, use a weatherproof sealant around the edges to prevent water intrusion.
5. Adjusting the Beam Direction
Once the fixture is mounted, adjust the beam direction to optimize illumination. Aim the flood light slightly downward to minimize glare and ensure even distribution of light. Use the adjustable mounting brackets or swivel joints to fine-tune the beam angle.
6. Final Inspection and Testing
Before putting your new flood light into service, conduct a thorough inspection to ensure that all components are properly installed and functioning as intended. Turn on the light and check the illumination pattern, ensuring that it meets your expectations. If any issues arise, consult the manufacturer's instructions or an electrician for assistance.

How To Install A Flood Light The Home Depot

How To Install Outdoor Floodlights True Value

How To Install Outdoor Floodlights

How To Install Flood Lights Light Installation

How To Install Floodlights Safe Watertight And Properly Grounded

Step By Flood Light Installation Guide

How To Wire An Outdoor Flood Light Doityourself Com

How To Install Additional Wiring Add An Outdoor Floodlight

How To Install A Flood Light The Home Depot

Cost To Install Exterior Lights In 2024 Checkatrade
