How to Wire Outdoor Accent Lighting: A Step-by-Step Guide
Accent lighting is a fantastic way to highlight architectural features, create ambiance, and illuminate pathways in your outdoor space. Wiring outdoor accent lighting may seem daunting, but it's a straightforward process with the right tools and precautions. To ensure a safe and successful installation, follow these essential steps:
Step 1: Plan Your Layout
Before beginning wiring, determine the placement of your accent lights. Consider the areas you wish to illuminate, such as walkways, patios, or sculptures. Sketch a diagram to plan the location of fixtures, wires, and transformers.
Step 2: Choose the Right Materials
Select high-quality outdoor-rated lighting fixtures and wires designed to withstand weather conditions. Use 12-gauge or 14-gauge stranded copper wire for durability. Avoid using solid copper wire, as it is more prone to breaking.
Step 3: Safety Precautions
Always turn off the power at the circuit breaker before working on any electrical wiring. Use rubber gloves and safety glasses for protection. Ensure that all connections are weatherproof to prevent moisture damage.
Step 4: Install Fixtures and Wire
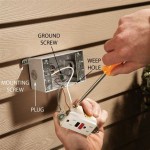
Mount the accent light fixtures securely to the desired locations. Run the electrical wires from the fixtures to a central junction box. Use wire nuts to connect the wires safely, ensuring the proper color-coding (black to black, white to white, and green or bare wire to ground).
Step 5: Protect the Wires
Bury the wires underground or run them through conduit for protection from damage. Use direct burial wire for underground installation, which is designed to withstand moisture and UV radiation.
Step 6: Install the Transformer
The transformer reduces the voltage from your home's electrical system to the lower voltage required for accent lights. Mount the transformer in a dry, protected location and connect the input wires to the household circuit. Connect the output wires to the junction box.
Step 7: Connect the Power
Turn on the power at the circuit breaker. Test the lights to ensure they are functioning correctly. If there are any issues, check the connections thoroughly before troubleshooting further.
Additional Tips:
- Use a low-voltage system (12 volts or 24 volts) for safety and energy efficiency.
- Consider using a timer or motion sensor to control the lights automatically.
- Stake wires to the ground to prevent tripping hazards.
- Inspect the wiring periodically and make repairs as needed.
- If you are unsure about any aspect of the installation, consult a qualified electrician for assistance.

Outdoor Low Voltage Lighting Diy Family Handyman

The Easiest Way To Install Low Voltage Landscape Lighting Abby Organizes

How To Install Outdoor Landscape Accent Lighting

Planning Your Low Voltage Outdoor Landscape Lighting 1000bulbs Blog

Planning Your Low Voltage Outdoor Landscape Lighting 1000bulbs Blog

Your Complete Guide To Outdoor Accent Lighting Electrician Nwa

Planning Your Low Voltage Outdoor Landscape Lighting 1000bulbs Blog

How To Add Accent Lights Your Trees And Yard Lightology

How To Install Outdoor Lighting And Diy Family Handyman

The Easiest Way To Install Low Voltage Landscape Lighting Abby Organizes
Related Posts


