How to Wire a Timer for Outdoor Lights
Outdoor lighting provides security, ambiance, and functionality to any property. Using a timer to automate the process can save energy, enhance safety, and create a more welcoming atmosphere. This guide will walk you through the steps of wiring a timer for your outdoor lights, ensuring a safe and effective installation.
Choosing the Right Timer
The first step is selecting the appropriate timer for your needs. Consider the following factors:
- Type of Timer: Digital timers offer programmable settings, while analog timers use a dial to adjust timing. Choose the option that best suits your preferences and desired level of control.
- Number of Circuits: If you need to control multiple outdoor lights, a timer with multiple circuits will be necessary. Ensure the timer's capacity matches the number of lights you intend to connect.
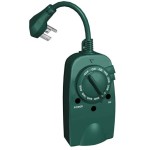
- Voltage: Outdoor timers are typically designed for 120-volt circuits. Verify the voltage compatibility before purchasing.
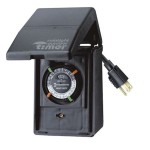
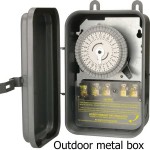
- Weatherproof Rating: Outdoor timers should be weather resistant, ideally with a rating of at least weatherproof (WP) for outdoor use. This will ensure their longevity and reliability in challenging weather conditions.
Wiring the Timer
Once you have the timer, follow these steps to wire it properly:
- Turn off the power: Locate the circuit breaker that controls the outdoor lights and switch it off to prevent electrical shocks.
- Connect the timer to the power source: Identify the black (hot), white (neutral), and ground wires in the electrical box. Connect the black wire from the timer to the black wire in the box, the white wire from the timer to the white wire in the box, and the green wire from the timer to the green wire in the box. Use wire nuts to securely connect the wires.
- Connect the timer to the lights: Extend the new power wires from the timer to the outdoor light fixtures. Connect the black wire from the timer to the black wire in the fixture's wiring box, the white wire from the timer to the white wire in the fixture's wiring box, and the green wire from the timer to the green wire in the fixture's wiring box. Secure the wires with wire nuts.
- Test the connection: Once the connections are made, turn the circuit breaker back on. Test the timer by turning it on and off to ensure the lights function correctly.
Additional Tips
Consider these additional tips for a successful installation:
- Use appropriate wire gauge: The correct gauge of wire is crucial for safe and efficient electrical flow. Refer to the timer's specifications or consult an electrician to determine the proper wire gauge for your application.
- Mount the timer in a convenient location: Choose a location that is easily accessible and protected from the elements. If possible, mount the timer at a height that is out of reach of children and pets.
- Label the wires: Use wire markers or tape to label the wires before making connections. This will help you identify the wires during installation and troubleshooting.
- Consider a professional electrician: If you are not comfortable with electrical work, consult a qualified electrician for professional installation. They can ensure safe and compliant wiring for your outdoor timer.
By following these instructions and taking necessary precautions, you can successfully wire a timer for your outdoor lights, optimizing their functionality and enriching your outdoor space.

Electrical Installing A Outdoor Light Timer Home Improvement Stack Exchange

Wiring Up Pir To Outdoor Lights With Timer Diynot Forums

Installing A Timer

Easy To Install Programmable Timer The Lady Diy

Our Home From Scratch

Have A Question About Ge In Wall Digital Countdown Timer Pg 4 The Home Depot

Enerlites Timer Countdown Switch For Bathroom Fans Indoor And Outdoor Lights On Off White 5 Pack Com

Dewenwils Outdoor Light Timer With 12ft Extension Cord Photocell Switchfor Holiday Decorations Landscape String Lights

2 Outdoor Countdown Timer W Photosensor Prime Wire Cable Inc

How To Reset Your Landscape Lighting Timer Fall Back