How to Test an Outdoor Light Fixture
An illuminated, well-maintained landscape not only enhances your home's curb appeal but also makes it more secure. When one of your outdoor lights starts acting up, it's crucial to know how to test it so you can identify any issues and restore its proper functioning.
Testing an outdoor light fixture doesn't have to be complicated. By following a few simple steps, you can determine if there's a problem and troubleshoot it accordingly. Here's a comprehensive guide on how to test an outdoor light fixture:
Safety Precautions
- Turn off the power to the fixture at the circuit breaker or fuse box.
- Use a ladder to reach the fixture if necessary.
- Wear gloves when handling electrical components.
Step 1: Check the Power Supply
Before you test the fixture itself, ensure that there's power going to it. Use a non-contact voltage tester to check for power at the fixture's terminals.
If there's no power, check the circuit breaker or fuse that supplies power to the fixture. Reset the circuit breaker or replace the fuse if necessary.
Step 2: Examine the Bulb and Socket
Once you've confirmed that there's power to the fixture, check the bulb and socket. Remove the bulb and inspect it for any damage or loose connections. If the bulb appears fine, try inserting a different bulb into the socket to see if it works.
If neither bulb lights up, there may be an issue with the socket. Check for any loose wires or signs of corrosion. If the socket is damaged, it may need to be replaced.
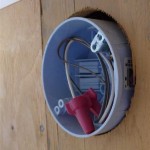
Step 3: Test the FixtureWiring
If the bulb and socket are fine, the problem may be with the fixture's wiring. Use a multimeter to test for continuity between the fixture's terminals and the power supply wires.
Set the multimeter to the ohms scale and touch one probe to each of the fixture's terminals. If there's continuity, you should hear a beep or see a low resistance reading on the multimeter.
If there's no continuity, there's a break in the wiring somewhere between the fixture and the power supply. You may need to trace the wires to find the break and repair it.
Step 4: Test the Photocell (if applicable)
If your outdoor light fixture is equipped with a photocell, it's responsible for turning the light on and off automatically based on changes in ambient light levels.
To test the photocell, cover it with a piece of electrical tape and turn the power back on. If the light turns on, the photocell is faulty and needs to be replaced.
Conclusion
Testing an outdoor light fixture is a simple and straightforward process that can help you identify potential problems and restore the fixture's proper functioning. By following the steps outlined above, you can troubleshoot the issue and get your outdoor lighting back up and running in no time.
If you encounter any complex electrical issues or are uncomfortable working with electricity, don't hesitate to contact a licensed electrician for assistance.

How To Test Low Voltage Outdoor Lighting Expert

Replacing An Outdoor Light Fixture

Using A Voltmeter To Troubleshoot Your Landscape Lights

Replacing An Outdoor Light Fixture

Motion Sensor Lights Tips To Reset Detector

Replacing An Outdoor Light Fixture

Replacing An Outdoor Light Fixture

How To Replace An Outside Light

How To Replace An Outside Light

How To Replace An Outdoor Light Fixture A Girl S Guide Home Diy
Related Posts