How To Set a Westinghouse Outdoor Light Timer
Westinghouse offers a variety of outdoor light timers, each designed to automate outdoor lighting schedules for convenience and security. Accurate timer settings ensure lights activate and deactivate at the desired times, conserving energy and enhancing property safety. This guide provides a comprehensive overview of setting various Westinghouse outdoor light timers.
1. Identifying the Timer Model
Before initiating the setup process, it is crucial to identify the specific Westinghouse timer model. Different models have varying features and programming interfaces. The model number is typically located on the timer itself. Refer to the user manual corresponding to the specific model for detailed instructions. The manual often contains diagrams and step-by-step procedures tailored to the timer's functionality.
2. Understanding the Timer Interface
Westinghouse timers typically feature a combination of dials, buttons, and switches. Familiarizing oneself with the function of each element is essential for successful programming. Common components include a clock, on/off switch, program pins, and mode selection options. Some models may also include features like daylight savings time adjustments and random on/off settings for added security.
3. Setting the Current Time
Accurate time setting is paramount for proper timer operation. Most Westinghouse timers utilize a small dial or digital display for time adjustment. Carefully set the current time, ensuring the AM/PM setting is correct if applicable. Some models may require setting the day of the week as well. Consult the user manual for specific instructions regarding time setting procedures for the particular model.
4. Programming the On/Off Times
Westinghouse timers employ various methods for programming the on/off cycles. Some models use pins or sliders that are pushed in or out to represent on/off periods within each hour or half-hour increment. Others offer digital interfaces allowing for precise time entry. Determine the desired on/off times for the lights and program the timer accordingly. Many models allow for multiple on/off periods throughout the day.
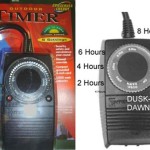
5. Utilizing Preset Programs (If Available)
Certain Westinghouse timer models offer preset programs for common lighting schedules, such as "Dusk to Dawn" or specific time blocks. These presets can simplify the programming process, especially for basic lighting needs. If available, select the preset program that best suits the desired lighting schedule. Refer to the user manual to understand the available preset options and their corresponding functionalities.
6. Setting the Days of the Week
Westinghouse outdoor light timers often allow users to specify the days of the week for which the programmed schedule is active. This feature allows for flexible customization, such as activating the lights only on weekdays or weekends. The day selection is typically controlled by small switches or buttons on the timer. Consult the user manual to understand how to configure the day settings for the specific timer model.
7. Testing the Timer
After programming the timer, it is recommended to test the settings to ensure accurate operation. Observe the lights to confirm they turn on and off at the programmed times. If the lights do not function as expected, review the timer settings and consult the user manual to troubleshoot any issues. It may be necessary to repeat the programming steps, ensuring all settings are correctly configured.
8. Utilizing Override Options
Many Westinghouse timers include an override function that allows users to manually turn the lights on or off without affecting the programmed schedule. This feature is useful for situations where temporary lighting control is needed. The override switch is typically located on the timer itself and clearly marked. Familiarize yourself with the override function to manage lighting needs outside the programmed schedule.
9. Seasonal Adjustments
As daylight hours change throughout the year, adjusting the timer settings may be necessary to maintain the desired lighting schedule. Some Westinghouse timers include a daylight savings time (DST) switch to automatically adjust the time by one hour. For models without this feature, manually adjusting the on/off times may be required. Regularly review and adjust the timer settings to ensure optimal performance throughout the year.
10. Troubleshooting Common Issues
Occasionally, users may encounter issues with their Westinghouse outdoor light timer. Common problems include incorrect time setting, faulty programming, or a tripped circuit breaker. Refer to the troubleshooting section of the user manual for guidance on resolving common issues. If the problem persists, contacting Westinghouse customer support may be necessary for further assistance.

How To Program And Set Time On The Westinghouse Automatic Electric Timer

Westinghouse Timers And Manuals

How To Program And Set Time On The Westinghouse Automatic Electric Timer

Westinghouse Timers And Manuals

Programming Your Mechanical Timer

How To Set A Plug Timer Mechanical Digital Switches

Westinghouse 3 Outdoor Heavy Duty Digital Photocell Timer Instructions Hunker

Westinghouse Outdoor Timer User Manual Manualzz

Westinghouse 2 Darkness Sensing Timer

Outdoor Digital Timer Photocell Mode Programming
Related Posts