How to Set a Raintight Outdoor Timer
Setting a raintight outdoor timer is essential for maintaining your landscape's health and saving water. Timers allow you to automate watering schedules, ensuring your plants receive the right amount of water at the right time. Choosing a raintight timer protects the device from the elements, extending its lifespan and ensuring reliable performance.
Essential Aspects of Setting a Raintight Outdoor Timer
Before diving into the steps, let's highlight some crucial aspects of setting a raintight outdoor timer:
- Choosing the Right Timer: Select a timer with features that meet your watering needs, such as multiple programs, adjustable run times, and water-saving settings.
- Proper Installation: Ensure the timer is installed correctly to prevent water damage and ensure it's accessible for adjustments.
- Programming the Timer: Set the appropriate watering schedule, considering factors like plant type, soil conditions, and weather patterns.
- Testing the Timer: Run a test cycle after programming to verify the timer's operation and make any necessary adjustments.
- Regular Maintenance: Periodically check the timer for leaks, damaged wires, or faulty components to ensure optimal performance.
Setting Your Timer
Now that we've covered the essential aspects, let's walk through the steps to set your raintight outdoor timer:
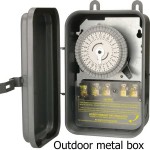
1. Choose a Location: Select a sheltered location where the timer won't be exposed to direct sunlight or rain. This will prolong its lifespan. 2. Install the Timer: Mount the timer securely on a wall or post, ensuring it's at a convenient height for adjustments. 3. Connect the Wires: Connect the wires from the timer to the solenoid valve that controls your irrigation system. 4. Set the Time: Use the dials or buttons on the timer to set the current time. 5. Program the Timer: Select the watering days and times based on your plant's needs. Set the run time for each watering cycle. 6. Adjust the Rain Sensor (Optional): If your timer has a rain sensor, adjust its sensitivity to prevent watering during rainfall. 7. Test the Timer: Run a test cycle to ensure the timer is working correctly. Adjust the settings as needed.Conclusion
Setting a raintight outdoor timer is straightforward if you follow the essential aspects and steps discussed above. By automating your watering schedule, you can save time, conserve water, and keep your landscape flourishing. Remember to regularly maintain your timer for optimal performance and longevity.

How To Use An Intermatic Heavy Duty Electrical Timer

Intermatic Timer

Intermatic Heavy Duty Raintight Outdoor Timer Hb11r 15 Amp 24 Hour Repeating

Intermatic Raintight Outdoor Timer Model Hb32r 24 Hour 10 Amp 1200 Watt 120 Volt

Woods 15 Amp 24 Hour Outdoor Plug In Heavy Duty Dual Mechanical Timer Black 50012wd The Home Depot

Bn Link Outdoor Timer With Photocell Light Sensor Waterproof 24 Hour Countdown 2 4 6 Or 8 Hours Mode 3 Grounded S For Home And Garden Black No Remote Control Com

Intermatic P1101 Plug In Timer Above Ground Pool Outdoor Inyopools Com

Buy Intermatic Mechanical Outdoor Timer Gray 40

Westek Outdoor Grounded Daily Mechanical Timer Dual White Tm1613dolb The Home Depot

Scott Aerator Timer 115 Volt Best S On Everything For Ponds And Water Gardens Webb