How to Set a Malibu Outdoor Timer
Malibu outdoor timers are a popular choice for homeowners seeking to automate their outdoor lighting, sprinklers, and other appliances. These timers offer convenience and energy efficiency, allowing you to schedule your devices to turn on and off automatically. Setting up a Malibu outdoor timer is a straightforward process that can be completed in a few simple steps.
Understanding Malibu Outdoor Timer Types
Malibu offers a range of outdoor timers, each with its own unique features and capabilities. The most common timer types include:
- Analog Timers: These timers feature a dial or rotary knob for setting the desired on and off times. They are simple to use and offer basic scheduling options.
- Digital Timers: Digital timers provide more sophisticated scheduling capabilities, allowing you to set specific days of the week, time intervals, and even random on and off times. They often include features like a built-in astronomical clock that adjusts the schedule based on sunset and sunrise.
- Smart Timers: Smart timers connect to your home Wi-Fi network, allowing you to control them remotely using a smartphone app. These timers offer the most advanced features, including customizable schedules, real-time monitoring, and integration with other smart home devices.
Setting Up a Basic Malibu Outdoor Timer
To set up a basic analog or digital Malibu outdoor timer, follow these steps:
- Identify the Timer Type: Determine whether you have an analog or digital timer. This will influence the specific steps involved in setting up the timer.
- Locate the On/Off Switch: Most Malibu timers have a designated switch for turning the timer on or off. Ensure the switch is in the "on" position before proceeding.
- Set the Clock: Adjust the clock on your timer to the current time. This is crucial for ensuring accurate scheduling.
- Choose a Schedule: Depending on the timer type, select the desired schedule using the dials, knobs, or buttons. For analog timers, use the rotating dials to set the on and off times. For digital timers, use the buttons to navigate through the menu and select the appropriate day of the week, time, and duration.
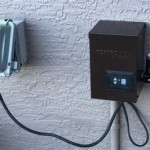
- Connect the Load: Connect the appliance or device you want to control to the timer's output terminals. This typically involves plugging the device into a special receptacle on the timer or attaching it to the timer's wiring.
- Test the Timer: Once the timer is set up, test the schedule by turning on the device manually and ensuring it turns off at the designated time.
Setting Up a Malibu Smart Timer
For Malibu smart timers, setting up the timer usually involves the following steps:
- Connect the Timer to Wi-Fi: Download the Malibu app from the App Store or Google Play Store. Open the app and follow the instructions to connect the timer to your home's Wi-Fi network.
- Create an Account: You may need to create an account with Malibu to access the app and manage your timer settings.
- Configure the Timer Settings: Use the app to customize the timer's schedule, including days of the week, time intervals, and specific events.
- Connect the Load: Connect the device you want to control to the timer's output terminals, just as you would with a basic timer.
- Monitor and Control: Once the timer is set up, you can monitor its status and make adjustments to the schedule from anywhere using the app.
Remember that specific instructions and features may vary depending on the exact Malibu timer model you have. Consult your timer's user manual for detailed instructions and troubleshooting tips.
How To Set The Timer On Intermatic Malibu Landscape Lighting Hunker
Instruction Manual For Malibu 300 Watt Transformer Falling Water
Intermatic Timer
Malibu Low Voltage Transformer 45 Watt For Outdoor Landscape Lighting Venus Manufacturing
Intermatic Timer
Malibu Low Voltage Transformer Installation Troubleshooting 2024
How To Use An Intermatic Heavy Duty Electrical Timer
Malibu 300 Watt Power Pack With Sensor And Weather Shield For Low Voltage Landscape Lighting Spotlight Outdoor Transformer 120v Input 12v Output 8100 0300 01
Malibu Intermatic Timer Lv345t 88 Watt Low Voltage Transformer For
Intermatic Malibu Outdoor Low Voltage Transformer Lights Timer Lv341t
Related Posts