How To Set a Hampton Bay Outdoor Light Timer
Hampton Bay offers a variety of outdoor light timers, from simple mechanical models to more advanced digital and smart timers. While the specific steps may vary slightly depending on the model, the general principles remain consistent. This guide provides a comprehensive overview of how to set different types of Hampton Bay outdoor light timers, empowering users to automate their outdoor lighting efficiently.
Setting a Mechanical Hampton Bay Timer
Mechanical timers are generally straightforward to operate. They typically feature a dial with segmented pins or levers that represent hours of the day. The desired on/off schedule is set by pushing the pins or levers in or out corresponding to the specific time windows. These timers operate on a 24-hour cycle and do not require batteries or external power.
To set a mechanical Hampton Bay timer, first locate the current time indicator on the dial. Rotate the dial until the current time aligns with the arrow or indicator mark. Then, identify the time slots when you want the lights to be on. Push the corresponding pins or levers outwards. The lights will turn on during these selected time periods and remain off during the periods where the pins are inwards. Finally, plug the timer into an outdoor outlet and plug the lights into the timer.
Some mechanical timers include a manual override switch. This switch allows users to bypass the timer and turn the lights on or off manually without disrupting the programmed schedule. Check your timer's instructions for the location and operation of the manual override.
Setting a Digital Hampton Bay Timer
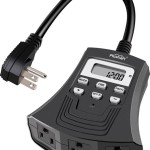
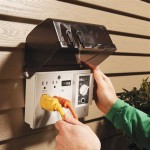
Digital timers provide more precise control over lighting schedules and offer a greater range of programming options. They typically feature a digital display and buttons for setting the time, day, and on/off cycles. Many digital timers also include features like random scheduling for security and daylight savings time adjustments.
Begin by plugging the timer into an outlet and then setting the current time and day. Refer to the timer's manual for the specific button combinations required to navigate the menu and input the correct information. Once the time and day are set, locate the programming options. Most digital timers allow users to set multiple on/off cycles per day, with different schedules for weekdays and weekends. Carefully input the desired on and off times for each cycle. Finally, plug the lights into the timer.
Some digital timers also include options for astronomic scheduling, which automatically adjusts the on/off times based on sunrise and sunset. This feature can be particularly useful for maintaining consistent lighting schedules throughout the year. Ensure you select the correct geographic location for accurate astronomic calculations.
Setting a Smart Hampton Bay Timer
Smart timers offer the most advanced functionality, allowing users to control their outdoor lighting remotely via a smartphone app. They typically connect to the home's Wi-Fi network, enabling control from anywhere with an internet connection. Smart timers often integrate with other smart home devices and platforms, providing seamless automation and voice control options.
Setting up a smart timer first requires downloading the corresponding app from the app store. Create an account and follow the in-app instructions to connect the timer to your Wi-Fi network. Once the connection is established, the app will guide you through the process of setting the time, day, and creating lighting schedules. Many smart timers offer advanced features like geofencing, which can automatically turn lights on or off based on your location. Additionally, some models include voice control compatibility with popular smart assistants.
Familiarize yourself with the app's interface and explore the various settings and options available. Customizing notification preferences and integrating the smart timer with other smart home devices can enhance the overall user experience and create a more integrated and automated home environment.
Always refer to the specific instructions provided with your Hampton Bay timer model for detailed guidance and troubleshooting tips. Understanding the features and functions of your particular timer will ensure proper setup and optimal performance.
Maintaining proper safety protocols is crucial when working with electrical devices. Always ensure the power is off at the breaker box before plugging or unplugging timers or lights. Avoid overloading circuits and use outdoor-rated timers and extension cords designed for exterior use.
By following these guidelines and consulting the manufacturer's instructions, users can easily set their Hampton Bay outdoor light timers and enjoy the convenience and energy efficiency of automated outdoor lighting.

How To Setup Programing Trouble Shooting The Hampton Bay Low Voltage Lanscape Transformer

Hampton Bay Low Voltage 120 Watt Landscape Lighting Transformer With Dusk To Dawn Sensor Sl 12a The Home Depot

Hampton Bay Low Voltage 300 Watt Landscape Lightin Transformer With Dusk To Dawn Sensor Diy 300ps The Home Depot

Hampton Bay Low Voltage 120 Watt Landscape Lighting Transformer With Dusk To Dawn Sensor Sl 12a The Home Depot

Landscape Lighting Replace A Transformer

Hampton Bay Sl20012a Landscape Transformer Lighting Low Voltage For

Hampton Bay Total Home Security Controller For Low Voltage Landscape Lighting Systems 99007 The Depot

Landscape Lights Not Working Solutions To 7 Common Problems

Hampton Bay Sl 30 12 Sv Low Voltage Watt Landscape Transformer

Harbor Breeze 200 Watt 12 Volt Multi Tap Landscape Lighting Transformer With Digital Timer And Dusk To Dawn Sensor In The Transformers Department At Com