How to Seal Outdoor Light Fixtures: A Comprehensive Guide to Protection
Protecting your outdoor light fixtures from the elements is essential not just for their aesthetic appeal but also for their safety and longevity. Rain, snow, and even direct sunlight can compromise the integrity of your fixtures and create potential electrical hazards. Luckily, sealing outdoor light fixtures is a relatively straightforward task that can be completed in a few simple steps.
Essential Materials
Before you begin, gather the following materials:
- High-quality silicone caulk or sealant
- Caulk gun
- Putty knife or small spatula
- Clean rags or paper towels
- Rubbing alcohol (optional)
Step-by-Step Sealing Instructions
Follow these steps to ensure a proper seal:
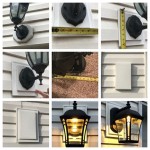
- Clean the Fixture Surface: Remove any dirt, debris, or old caulk from the surface of the fixture where you intend to apply the sealant. If possible, use rubbing alcohol to remove any oily residue.
- Load the Caulk Gun: Insert the silicone caulk cartridge into the caulk gun and cut the tip at a 45-degree angle. The size of the tip will depend on the width of the gap you need to fill.
- Apply the Caulk: Hold the caulk gun perpendicular to the surface and apply a bead of caulk along the perimeter of the fixture base where it meets the wall or ceiling. For corner joints, apply caulk to both sides of the joint.
- Smooth the Caulk: Use your putty knife or spatula to smooth the applied caulk, ensuring it fills the gap evenly and creates a watertight seal. Press firmly but gently to avoid creating air pockets.
- Remove Excess Caulk: Use a clean rag or paper towel to wipe away any excess caulk that may have squeezed out during application.
- Allow to Cure: Allow the caulk to cure according to the manufacturer's instructions. Curing times typically range from 24 to 72 hours.
Tips for a Lasting Seal
- Choose a high-quality silicone sealant that is specifically designed for outdoor use.
- Apply the sealant in moderate weather conditions, avoiding extreme heat or cold.
- Ensure the surface is completely dry and free of moisture before applying the sealant.
- Allow ample time for the sealant to cure before exposing it to harsh elements.
- Inspect the seal regularly and reseal if necessary to maintain optimal protection.
Benefits of Sealing Outdoor Light Fixtures
- Prevents Moisture Ingress: A well-sealed fixture prevents moisture from seeping into the electrical components, reducing the risk of short circuits and electrical fires.
- Protects from Corrosion: Moisture and humidity can corrode metal components of the fixture, leading to premature failure. Sealing prevents corrosion and extends the lifespan of the fixture.
- Enhances Aesthetics: A clean and sealed fixture enhances the overall appearance of your outdoor space, adding to its curb appeal.
- Reduces Energy Loss: Gaps in the seal can allow heated air to escape and cold air to enter, leading to energy loss. A tight seal maintains optimal temperature around the fixture, reducing energy consumption.

What To Use Seal Around Exterior Light Fixture Diy Home Improvement Forum

How To Caulk Around An Exterior Light Fixture Caulking Tips

Outdoor Light Fixture Makeover Using Metallic Paint Inmyownstyle Com

Caulking Exterior Lights And S Calfeutrage Apex

Specifying Gaskets For Outdoor Led Lighting Fixtures Tech Briefs

How To Spray Paint Outdoor Light Fixtures True Value

How To Replace An Outdoor Light Fixture Facets Of Lafayette

How To Replace An Outdoor Light

How To Replace Outdoor Wall Light Fixture

Advice On T Out Exterior Light Fixture Where Pancake Box Sticks Too Far Greenbuildingadvisor