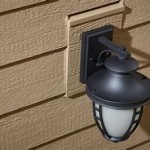
How to Seal an Outdoor Light Fixture on Siding
Properly sealing an outdoor light fixture is crucial for protecting a home from water damage, drafts, and pest infestations. A poorly sealed fixture can lead to rot, mold, and even electrical hazards. This guide provides a comprehensive overview of how to effectively seal an outdoor light fixture against the elements.
Assessing the Current Situation
Before beginning any sealing work, it's essential to assess the current state of the fixture and the surrounding siding. This assessment helps determine the necessary tools and materials and informs the best sealing approach.
Key points to consider:
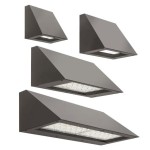
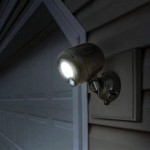
- Fixture Type: Identify the type of fixture (flush-mounted, wall-mounted, etc.) as this impacts the sealing method.
- Siding Material: The siding material (wood, vinyl, brick, etc.) dictates the appropriate sealant type.
- Existing Sealant: Check for existing sealant around the fixture. If present, determine its condition and whether it needs removal or repair.
- Gap Size: Measure the gaps between the fixture and the siding. This measurement helps determine the appropriate sealant backer rod size (if needed).
Gathering the Necessary Tools and Materials
Having the correct tools and materials on hand ensures a smooth and efficient sealing process. Using the wrong materials can compromise the seal and lead to future problems.
Essential tools and materials:
- Safety Glasses and Gloves: Protect eyes and skin from sealant and debris.
- Putty Knife or Scraper: Remove old sealant and smooth new sealant.
- Caulk Gun: Apply sealant evenly and efficiently.
- Sealant Backer Rod (if necessary): Fill larger gaps for efficient sealant use and prevent sealant from sinking into the gap.
- Exterior-Grade Sealant: Choose a sealant compatible with both the fixture and siding materials. Look for UV resistance and flexibility.
- Ladder (if necessary): Safely access the fixture.
- Drop Cloths: Protect surrounding areas from sealant drips.
- Utility Knife: Cut sealant tubes and backer rod.
- Damp Cloth or Sponge: Clean up excess sealant.
Preparing the Surface
Proper surface preparation is crucial for achieving a long-lasting seal. A clean and dry surface allows the sealant to adhere correctly and prevents future failures.
Surface preparation steps:
- Remove Old Sealant: Use a putty knife or scraper to completely remove any existing sealant. Be careful not to damage the siding or fixture.
- Clean the Surface: Thoroughly clean the area around the fixture with a mild detergent and water. Remove any dirt, debris, or mildew. Rinse well and allow to dry completely.
Applying the Sealant
Careful sealant application is essential for creating a watertight and aesthetically pleasing seal. A consistent bead of sealant ensures complete protection.
Sealant application steps:
- Install Backer Rod (if necessary): If gaps are larger than ¼ inch, insert backer rod into the gap to prevent sealant from sinking and wasting material. The backer rod should fill the gap without protruding.
- Apply Sealant: Cut the tip of the sealant tube at a 45-degree angle and puncture the inner seal. Load the tube into the caulk gun. Apply a continuous bead of sealant around the perimeter of the fixture, ensuring complete coverage of the gap.
- Smooth the Sealant: Use a wet finger or putty knife to smooth the sealant bead, creating a clean and consistent finish. Remove any excess sealant.
- Allow to Dry: Allow the sealant to dry completely according to the manufacturer's instructions before exposing it to moisture.
Choosing the Right Sealant
Selecting the correct sealant is paramount for a successful and long-lasting seal. Different sealants have varying properties, making them suitable for specific applications.
Key sealant considerations:
- Silicone Sealant: Offers excellent flexibility and adhesion, making it suitable for various siding materials. It's also highly water-resistant and UV-resistant.
- Polyurethane Sealant: Provides excellent durability and paintability. It's a good choice for areas subject to movement or expansion.
- Butyl Rubber Sealant: Highly water-resistant and remains flexible in cold temperatures. It's often used for sealing around windows and doors.
- Compatibility: Ensure the chosen sealant is compatible with both the fixture material and the siding material to avoid adhesion problems.
Maintaining the Seal
Regular inspection and maintenance of the seal around the outdoor light fixture are essential to prevent future problems. Early detection and repair of any issues can avoid significant damage.
Maintenance tips:
- Regular Inspection: Inspect the seal at least annually, or more frequently in harsh climates, for any signs of cracking, peeling, or deterioration.
- Cleaning: Clean the seal periodically with mild soap and water to remove dirt and debris that can compromise its integrity.
- Reapplication: If the sealant shows signs of damage, remove the old sealant and reapply a new bead following the steps outlined above.

How Do You Mount An Exterior Light Fixture On Siding With A Rainscreen Greenbuildingadvisor

How To Caulk Around An Exterior Light Fixture Caulking Tips

How To Add A Light Fixture Vinyl Siding Electrical Box Aka J Block

Top Tips Replacing An Outdoor Wall Sconce Porch Daydreamer

Surface Mount Junction Box For Exterior Light Greenbuildingadvisor

Solution For Mounting Lights To Ribbed Exterior Surface The Garage Journal

Caulking Exterior Lights And S Calfeutrage Apex

Top Tips Replacing An Outdoor Wall Sconce Porch Daydreamer

Caulking Exterior Lights And S Calfeutrage Apex

How To Install Outdoor Porch Lights
Related Posts