How to Seal Around an Outdoor Light Fixture
Properly sealing around an outdoor light fixture is crucial for protecting the fixture, preventing water damage, and improving energy efficiency. A poorly sealed fixture can lead to issues such as short circuits, insect infestations, and rotted wood. This guide provides a detailed explanation of how to effectively seal around an outdoor light fixture.
1. Gather Necessary Tools and Materials
Before starting the sealing process, gather all necessary tools and materials to avoid interruptions. Having everything readily available ensures a smoother and more efficient workflow.
- Safety Glasses
- Work Gloves
- Caulk Gun
- Utility Knife
- Putty Knife
- Exterior-Grade Caulk (Silicone or Polyurethane)
- Ladder (if necessary)
- Drop Cloths or Newspaper
- Screwdriver (if needed for fixture removal)
- Wire Brush or Stiff Bristled Brush
2. Turn Off the Power
Safety is paramount when working with electrical fixtures. Before touching the fixture or any surrounding wires, switch off the power at the circuit breaker. Double-check that the power is off by attempting to turn on the light. This will prevent electrical shocks and ensure a safe working environment.
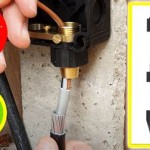
3. Clean the Area
A clean surface is essential for proper adhesion of the sealant. Use a wire brush or a stiff-bristled brush to remove any loose debris, dirt, old caulk, or paint chips from around the fixture. This will create a clean surface for the new caulk to adhere to, ensuring a long-lasting seal.
4. Inspect the Existing Seal (If Applicable)
If the fixture already has a seal, carefully inspect it for any cracks, gaps, or signs of deterioration. If the existing seal is compromised, remove it completely using a utility knife or putty knife. This ensures the new seal can bond directly to the surface, providing a more effective barrier against the elements.
5. Choose the Right Caulk
Selecting the correct type of caulk is crucial for the longevity and effectiveness of the seal. Use a high-quality, exterior-grade caulk specifically designed for outdoor use. Silicone or polyurethane caulk are excellent choices due to their flexibility, durability, and weather resistance. Ensure the caulk is paintable if you intend to paint the area after sealing.
6. Apply the Caulk
Apply a continuous bead of caulk around the perimeter of the fixture where it meets the wall or mounting surface. Ensure the caulk fills any gaps or crevices completely. A smooth and even application is essential for a proper seal. For larger gaps, consider using backer rod before applying the caulk to prevent excessive caulk usage and ensure a proper seal.
7. Smooth the Caulk
After applying the caulk, immediately smooth the bead with a wet finger or a caulk smoothing tool. This creates a professional finish, ensures proper contact with the surface, and further forces the caulk into any gaps. Remove any excess caulk with a damp cloth.
8. Allow the Caulk to Dry
Allow the caulk to dry completely according to the manufacturer's instructions. Drying times vary depending on the type of caulk and environmental conditions. Avoid touching or disturbing the caulk during the drying process. Refrain from turning the power back on to the fixture until the caulk is fully cured.
9. Test the Seal
Once the caulk is dry, test the seal by spraying the area around the fixture with a garden hose. Check for any leaks or water penetration. If any leaks are detected, reapply caulk to the affected areas. After confirming a watertight seal, restore power to the fixture.
By following these steps, homeowners can effectively seal around their outdoor light fixtures, protecting them from the elements and extending their lifespan.
What To Use Seal Around Exterior Light Fixture Diy Home Improvement Forum
Caulking Exterior Lights And S Calfeutrage Apex
How To Spray Paint Outdoor Light Fixtures True Value
Specifying Gaskets For Outdoor Led Lighting Fixtures Tech Briefs
How To Install Outdoor Lighting And Diy Family Handyman
Damp Vs Wet Location Lighting Flip The Switch
Update Your Light Fixtures No Electrician Required
Radiant Lighting What Is A Weatherproof Light Learn More At The Blog
How To Fit Outdoor Lights Lighting Electrical Security B Q
Where Not To Caulk Around Windows Mr Handyman