How to Replace an Outdoor Wall Light
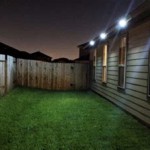
Outdoor wall lights provide illumination and enhance the aesthetics of your home's exterior. Over time, these lights may need replacement or even be upgraded to more energy-efficient models. Replacing an outdoor wall light is a relatively straightforward DIY project that can be accomplished with basic tools and a bit of knowledge. This article outlines the necessary steps to replace your outdoor wall light safely and effectively.
Step 1: Safety Precautions
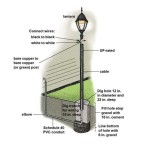
Before starting any electrical work, it's crucial to prioritize safety. Always disconnect the power to the light fixture at the circuit breaker box. This prevents electrical shock and allows you to work on the fixture safely. When working with electrical wires, use insulated tools and never touch exposed wires with bare hands. Ensure you have a ladder that is stable and securely positioned for reaching the fixture.
Step 2: Prepare the Area
Once the power to the fixture is disconnected, you can begin preparing the work area. Remove any surrounding obstructions, such as plants or furniture, that might interfere with your work. If the light fixture is attached to siding, remove any trim or molding pieces that might hinder access. Clean the area around the light fixture to ensure a clear and safe working environment.
Step 3: Remove the Old Fixture
Before removing the old fixture, examine the wiring connections. Carefully note the position of each wire to ensure you reconnect them correctly to the new fixture. This is crucial for maintaining the proper circuit and ensuring the light functions correctly. Use a screwdriver to detach the mounting screws that hold the fixture to the wall. Gently disconnect the wiring connections, taking care not to damage them. Once the wires are disconnected, carefully lower the old fixture away from the wall.
Step 4: Install the New Fixture
With the old fixture removed, you can begin installing the new one. Follow the manufacturer's instructions for mounting the new fixture. Typically, this will involve attaching the mounting plate to the wall and then securing the fixture to the plate. Before connecting the wires, ensure that the new fixture has the same wiring configuration as the old one. Connect the ground wire (usually green or bare copper) to the corresponding ground terminal on the new fixture. Connect the neutral wire (usually white) to the neutral terminal and the hot wire (usually black) to the hot terminal. It is advisable to double-check your connections before turning the power back on.
Step 5: Final Touches
After connecting the wires, carefully attach the fixture to the mounting plate and tighten the screws. Ensure the fixture is securely mounted and level. Replace any trim or molding pieces removed earlier. Turn the power back on at the circuit breaker box to test the light. If the light works, congratulations! You have successfully replaced your outdoor wall light. If the light doesn't function, go back and carefully check your wiring connections. Ensure that all wires are securely connected to the correct terminals. If the issue persists, consult a qualified electrician for assistance.

Top Tips Replacing An Outdoor Wall Sconce Porch Daydreamer

How To Replace An Outside Light

How To Replace An Outdoor Light Fixture Facets Of Lafayette

Replacing An Outdoor Light Fixture Concord Carpenter

How To Install A Sconce Outdoors Bob Vila

How To Install Outdoor Wall Lights

Top Tips Replacing An Outdoor Wall Sconce Porch Daydreamer

How To Fit Outdoor Lights Lighting Electrical Security B Q

Outdoor Light Easy Installation Without Touching The House Electrics

Outdoor Light Fixture Repair Tips And How Tos Life S Dirty Clean Easy