How to Replace a Motion Sensor for Outdoor Lights
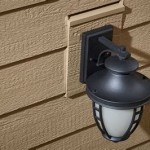
Outdoor motion sensor lights provide security and convenience, but over time, these sensors can malfunction. A faulty sensor may not detect movement, causing the lights to stay off when needed, or it might activate unnecessarily, creating nuisance lighting. Replacing a motion sensor is a straightforward DIY project that can restore your outdoor lighting system to optimal functionality. This guide will walk you through the steps involved in replacing a motion sensor, from assessing the issue to completing the installation.
Assessing the Issue
Before embarking on the replacement, it's crucial to confirm that the motion sensor is indeed the culprit. Test the lights by manually turning them on and off. If they function properly when switched directly, the problem likely lies with the sensor. Next, inspect the sensor for any visible signs of damage, such as cracks, loose wires, or corrosion. If these are present, it's highly probable that the sensor needs replacement. If the sensor appears intact, try testing its sensitivity by moving near it. If it fails to detect movement, it is likely faulty.
Gathering the Necessary Materials
Once you've determined that the motion sensor requires replacement, gather the following materials: *
New motion sensor:
Choose a sensor with compatible voltage and mounting options. *Wire strippers:
To strip the insulation from the wires. *Wire connectors:
To connect the wires securely. *Screwdriver:
To remove the old sensor and install the new one. *Voltage tester:
To ensure the power is off before working on the wiring. *Safety glasses:
To protect your eyes from debris. *Ladder:
To access the sensor if it's mounted high.Replacing the Motion Sensor
Follow these steps to replace the motion sensor: 1.
Turn off the power:
Locate the circuit breaker controlling the outdoor lights and switch it off. Confirm that the power is off by testing the lights with a voltage tester. 2.Remove the old sensor:
Unscrew the screws holding the sensor to the mounting bracket. Gently disconnect the wires from the sensor, taking note of the color coding of each wire. 3.Install the new sensor:
Attach the new sensor to the same bracket, ensuring it is securely fastened. Align the new sensor with the old one for proper placement. 4.Connect the wires:
Connect the wires from the new sensor to the corresponding wires from the wiring. Pay close attention to the color coding. For example, a black wire typically connects to the "hot" wire, a white wire to the "neutral" wire, and a ground wire (often green or bare copper) to the ground wire. Use wire connectors to create secure connections. 5.Test the sensor:
Turn the power back on at the circuit breaker. Test the new sensor by walking in front of the sensor and observing if the lights turn on and off as expected. If the lights don't work, double-check the wire connections. If the new sensor doesn't function, it may be faulty, and you'll need to contact the manufacturer.Additional Considerations
When replacing a motion sensor, consider these factors: *
Sensor type:
Choose a sensor with features suitable for your needs. For example, some sensors have adjustable sensitivity, while others offer different lighting durations. *Weather resistance:
Opt for a weather-resistant sensor designed for outdoor use. *Installation height:
The mounting height affects the range and detection pattern of the sensor. *Wiring:
Before purchasing a new sensor, ensure you have the correct type and size of wiring.Replacing a motion sensor is a simple task that can improve the functionality of your outdoor lighting system. By following these steps and taking appropriate precautions, you can confidently complete the replacement and enjoy the enhanced security and convenience that motion sensor outdoor lights provide.

How To Install An Outdoor Motion Sensor Light With Pictures

How To Replace A Motion Sensor For Outdoor Lights

How To Install Security Lights Diy Family Handyman

Motion Light Sensor Replacement

Installing A Remote Motion Detector For Lighting Diy

A Short Guide To Fixing And Replacing Faulty Motion Sensor Lights

How To Install Replace Outdoor Light Easy Simple

Motion Sensor Lights Tips To Reset Detector

How To Wire Motion Sensor Occupancy Sensors

How To Install A Motion Sensor Light Four Generations One Roof
Related Posts