How to Install Outdoor Wall Lights: A Comprehensive Guide
Outdoor wall lights not only enhance the aesthetic appeal of your home but also illuminate walkways, patios, and entrances, ensuring safety and functionality. Installing them correctly is crucial to ensure they operate optimally and last for years to come.
Planning and Preparation
Before you begin, take the following steps:
- Choose appropriate lights: Consider the size, style, and brightness of the lights based on the area you're illuminating.
- Select the right location: Determine the best placement for the lights, taking into account the distance from the door or walkway, the height, and any potential obstructions.
- Check electrical wiring: Ensure there's an existing electrical box or junction point at the installation location.
- Gather necessary tools: You'll need a drill, screwdriver, electrical tape, wire strippers, and a level.
Step-by-Step Installation
Once you've prepared, follow these steps:
1. Turn off Electricity:
Switch off the power at the electrical panel before starting any electrical work for safety.
2. Remove Old Light (if applicable):
If there's an existing light, carefully disconnect the wires and unscrew the mounting plate.
3. Mount the Bracket:
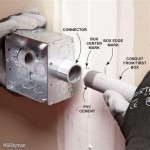
Align the mounting bracket on the wall at the desired location. Use a drill to create pilot holes, insert screws, and secure the bracket.
4. Connect Wiring:
Strip the insulation off the ends of the electrical wires. Connect the ground wire (green or bare copper) to the ground terminal on the bracket, the white wire to the neutral terminal, and the black wire to the hot terminal. Secure the connections with wire nuts.
5. Attach the Light Fixture:
Fit the light fixture onto the mounting bracket and secure it with nuts or screws, following the manufacturer's instructions.
6. Check for Level and Alignment:
Use a level to ensure the light is straight and aligned correctly. If necessary, adjust the bracket or fixture until it's level.
7. Restore Power and Test:
Turn on the power at the electrical panel and test the light to ensure it's functioning properly.
Tips and Considerations
* Use weather-resistant lights and fixtures for outdoor applications. * Consider LED lights for energy efficiency and long lifespan. * Install the lights at a height that's suitable for your needs and doesn't obstruct walkways. * Follow manufacturer's instructions carefully for specific installation requirements. * If you're not comfortable with electrical work, consult a qualified electrician for assistance.Conclusion
With careful planning and execution, installing outdoor wall lights can be a straightforward and rewarding task. By following the steps outlined above, you can ensure that your lights are properly installed, enhancing the safety, aesthetic appeal, and functionality of your outdoor spaces.

How To Install Outdoor Wall Lighting Light Fixtures Mr Electric

Home Luminaire Spence 1 Light White Outdoor Wall Lantern Sconce With Seeded Glass And Built In Gfci S 31856 The Depot
Top Tips Replacing An Outdoor Wall Sconce Porch Daydreamer

How To Fit Outdoor Lights Lighting Electrical Security B Q

How To Wire And Fit Outdoor Lights Diy Doctor

Top Tips Replacing An Outdoor Wall Sconce Porch Daydreamer

How To Install An Exterior Light And 3 Common Mistakes Avoid

Outdoor Light Easy Installation Without Touching The House Electrics

Outdoor Lighting Guide Delmarfans Com

How To Install Outdoor Wall Lights
