How to Install an Outdoor Wall Light
Installing an outdoor wall light enhances curb appeal and provides essential illumination for safety and security. This guide offers a comprehensive walkthrough of the installation process, equipping homeowners with the knowledge to complete the project effectively.
Safety First: Before commencing any electrical work, always disconnect the power supply to the circuit at the main electrical panel. Verify the disconnection using a non-contact voltage tester. This crucial step prevents electrical shocks and ensures a safe working environment.
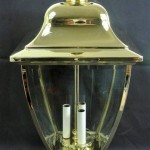
Gathering Necessary Tools and Materials: Proper preparation streamlines the installation process. Assemble the following tools: voltage tester, wire strippers, electrical tape, screwdriver (Phillips and flathead), drill with appropriate drill bits (including masonry bits if installing on brick or concrete), level, wire connectors, caulk (for weatherproofing), and safety glasses. In terms of materials, ensure you have the chosen outdoor wall light fixture, appropriate electrical box (weatherproof and rated for outdoor use), and mounting hardware (typically included with the fixture).
Mounting the Electrical Box: The electrical box provides the secure foundation for the light fixture. If replacing an existing fixture, the existing box can likely be reused if it is in good condition. If installing a new light, a new box will need to be installed. For installations on siding, a surface-mount box is typically used. For installations on brick or concrete, a recessed box is required. Follow the manufacturer’s instructions for the chosen box type for proper installation and secure mounting.
Making the Electrical Connections: With the electrical box securely mounted, the wiring can be connected. Carefully feed the electrical cable (typically Romex) through the designated opening in the box. Use wire strippers to remove approximately ½ inch of insulation from the ends of the black (hot), white (neutral), and green or bare copper (ground) wires from both the house wiring and the fixture wiring. Connect the wires using approved wire connectors: black to black, white to white, and ground to ground (including the ground screw on the electrical box if present). Ensure the connections are secure and tightly twisted.
Securing the Fixture to the Electrical Box: After completing the wiring connections, carefully tuck the wires into the electrical box. Align the mounting bracket of the wall light fixture with the electrical box and secure it using the provided screws. Ensure the fixture is mounted level, both horizontally and vertically, using a level to ensure accurate placement.
Attaching the Light Fixture and Cover Plate: Depending on the fixture design, the light fixture body is then attached to the mounting bracket. This typically involves aligning the fixture and securing it with screws or decorative nuts. Finally, attach the cover plate or other decorative elements that conceal the electrical box and mounting hardware, completing the fixture assembly.
Sealing and Weatherproofing: Protecting the electrical connections from the elements is critical for safety and longevity. Apply a bead of silicone caulk around the edges where the fixture meets the wall. This seals any gaps and prevents moisture from entering the electrical box. Ensure the caulk is applied evenly and smoothly for a professional finish.
Restoring Power and Testing: Once the caulk has dried completely (refer to the caulk manufacturer's instructions for drying times), restore power to the circuit at the main electrical panel. Turn on the light switch to verify the fixture operates correctly. If the light does not function, double-check the wiring connections and ensure the power supply is properly restored.
Choosing the Right Bulb: The final step involves selecting and installing the appropriate light bulb for the fixture. Consider the lumen output (brightness), color temperature (warm or cool white), and energy efficiency when choosing a bulb. Ensure the chosen bulb is compatible with the fixture's socket type and wattage limitations, as indicated on the fixture’s labeling.
Local Electrical Codes: It is important to note that local electrical codes may have specific requirements for outdoor lighting installations. Consult local building codes and regulations before beginning the project. In some areas, a permit may be required for electrical work. Adhering to local codes ensures the installation is safe and compliant with regulations.
Professional Assistance: While this guide provides comprehensive instructions, some homeowners may prefer to engage a qualified electrician for the installation. If you are unsure about any aspect of the process, or if the installation involves complex wiring or challenging conditions, seeking professional assistance is highly recommended.

How To Install Outdoor Wall Lighting Light Fixtures Mr Electric

Top Tips Replacing An Outdoor Wall Sconce Porch Daydreamer

Installing Garden Wall Lights

How To Install And Wire Outdoor Light Fixtures Easy Home Diy Project

Home Luminaire Spence 1 Light White Outdoor Wall Lantern Sconce With Seeded Glass And Built In Gfci S 31856 The Depot

Bracket Installation Motion Sensor Outdoor Wall Sconce Sytmhoe

How To Install Outdoor Wall Lighting For Home Improvement

Top Tips Replacing An Outdoor Wall Sconce Porch Daydreamer

How To Install Outdoor Wall Lights

How To Install Outdoor Wall Lighting