How To Install Outdoor Step Lights In Concrete Slabs
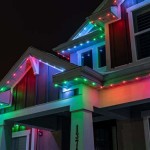
Outdoor step lights enhance safety and aesthetics, providing illumination for nighttime navigation. Installing these lights in existing concrete slabs requires careful planning and execution. This article outlines the process, emphasizing safety and proper installation techniques.
Planning and Preparation
Before beginning the installation, careful planning is crucial. Determine the ideal light placement for optimal visibility and aesthetics. Consider factors like step width, riser height, and overall landscape design. Measure the distances between planned fixture locations and the power source to determine the necessary wiring length. Select low-voltage landscape lighting for safety and ease of installation. Choose fixtures designed for outdoor use and rated for wet locations.
Gather the necessary tools and materials. These typically include a core drill with a diamond bit sized appropriately for the light fixtures, a hammer drill and masonry bits for pilot holes, wire connectors, electrical tape, silicone sealant, a level, a voltage tester, safety glasses, work gloves, and a dust mask. Review local building codes for specific requirements regarding outdoor electrical installations.
Marking and Drilling
Precise marking is essential for accurate light placement. Mark the desired locations for the light fixtures on the concrete slabs using a pencil or marker. Ensure the markings are level and evenly spaced. Verify the markings align with planned wiring routes and avoid obstructions within the slab.
Using a core drill equipped with a diamond bit of the appropriate diameter, carefully drill holes into the marked locations. The depth of the holes should accommodate the light fixture housing and any necessary wiring connections. Maintain a firm grip on the core drill to prevent slippage. Wear safety glasses and a dust mask to protect against debris.
Wiring and Connections
Before commencing any electrical work, disconnect the power to the circuit at the main breaker panel. Run the low-voltage wiring from the power source to each light fixture location, following the planned wiring route. Feed the wiring through the drilled holes and connect it to the light fixtures according to the manufacturer's instructions.
Use waterproof wire connectors rated for outdoor use to ensure secure and weather-resistant connections. Apply electrical tape to further protect the connections from moisture. If the light fixture requires grounding, ensure the ground wire is properly connected. Carefully tuck the wiring into the fixture housing and ensure no exposed wires remain outside the housing.
Securing and Sealing
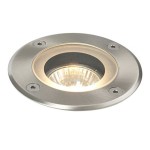
Once the wiring is connected, position the light fixture within the drilled hole. Use a level to ensure the fixture is properly aligned and flush with the concrete surface. Secure the fixture in place using the mounting hardware provided by the manufacturer. Follow the manufacturer's instructions for specific mounting procedures.
Apply a bead of silicone sealant around the perimeter of the fixture where it meets the concrete. This creates a weatherproof seal, preventing water from entering the hole and damaging the wiring or fixture. Smooth the sealant with a wet finger for a clean finish. Allow the sealant to dry completely according to the manufacturer's instructions.
Testing and Finalization
After the sealant has dried, restore power to the circuit. Test each light fixture to ensure it is functioning correctly. Verify the wiring connections are secure and that no exposed wires are present. Inspect the silicone seal for any gaps and reapply sealant if necessary.
Safety Precautions
Throughout the installation process, prioritize safety. Always disconnect the power before working with electrical wiring. Wear appropriate safety gear, including safety glasses and work gloves. Use caution when operating power tools, such as the core drill and hammer drill. Follow the manufacturer's instructions for all tools and materials. If uncertain about any aspect of the installation, consult a qualified electrician.
Maintenance
Regular maintenance will prolong the lifespan of the step lights. Periodically inspect the fixtures for damage and clean them with a soft cloth. Check the wiring connections for tightness and replace any damaged wiring. Ensure the silicone sealant remains intact and reapply if necessary. Following these maintenance practices will ensure the step lights continue to provide safe and reliable illumination for years to come.

How To Add Lights In Concrete Steps Network

How To Add Lights In Concrete Steps Network

How To Add Lights In Concrete Steps Network

How To Attach Step Lights Under Stair Treads Decksdirect

How To Install Led Recessed Lights For Outdoor Concrete Spaces In Lite Lighting

How To Attach Step Lights Under Stair Treads Decksdirect

How To Install Concrete Step Lights

Truly Innovative Garden Step Lighting Ideas Club Outdoor Stair Stairs Strip

How To Choose And Install Led Lights On Staircases Steps

How To Install Under Stair Lighting 1000bulbs Blog