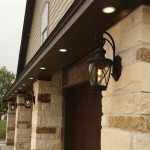
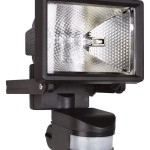
How to Install an Outdoor Light Fixture on Stone
Installing an outdoor light fixture on stone can enhance the beauty and safety of your property. While the process may seem daunting, it can be accomplished with careful preparation and the right tools. Here's a comprehensive guide to help you through the steps:
Tools and Materials
Safety Precautions
Before starting, ensure you have turned off the electricity to the area where you will be working. Wear safety glasses when drilling and use a ladder for accessing higher areas.
Step 1: Plan the Location
Determine the desired location for your light fixture and mark the spot on the stone surface. Ensure that the fixture will provide adequate illumination and is not obstructed by any obstacles.
Step 2: Prepare the Electrical Wires
Connect the electrical wires to the light fixture according to the manufacturer's instructions. Use wire strippers to remove about 1/2 inch of insulation from the ends of the wires and twist them together securely.
Step 3: Drill the Holes
Using a drill with a masonry bit, drill holes into the stone surface at the marked locations. The holes should be slightly larger than the diameter of the mounting screws. If the stone is particularly hard, you may need to use masonry anchors to secure the fixture.
Step 4: Install the Mounting Bracket
Insert the mounting bracket for the light fixture into the drilled holes and secure it using the provided screws. Ensure that the bracket is level and tight.
Step 5: Connect the Fixture
Connect the electrical wires from the fixture to the wires from the mounting bracket, twisting them together securely. Cover the connections with electrical tape or connectors.
Step 6: Secure the Fixture
Place the light fixture over the mounting bracket and secure it using the mounting screws. Ensure that the fixture is firmly in place and the wires are not pinched or damaged.
Step 7: Seal the Fixture (Optional)
To prevent water from entering the fixture, apply a thin bead of sealant around the base where it meets the stone surface. Smooth out the sealant with a damp cloth.
Step 8: Turn on the Electricity
Turn on the electricity to the light fixture and test it out. If the fixture is working properly, you have successfully installed it on the stone surface.
Additional Tips

How To Install An Outdoor Light Fixture On Stone Atkinson Inspection Services

Uneven Wall Installation Stone Cutting For Light Fixture Portofino Glen Hollow

How To Install Outdoor Light Fixture On Stone Without Ing

Fixing A Crooked Light Fixture On Stone Wall How To Play By

Uneven Wall Installation Stone Cutting For Light Fixture Portofino Glen Hollow

How To Update Outdoor Light Fixtures The Easy Way Confessions Of A Serial Do It Yourselfer

How To Install Outdoor Light Fixture On Stone Step By Guide Valla Blog

How To Change An Outdoor Light Fixture On Diffe Types Of Siding The Home Depot

How To Fit Outdoor Lights Lighting Electrical Security B Q

6 Ways To Light Up Stone And Brick Indoors Out
Related Posts