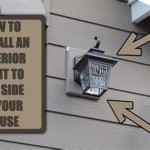
How to Install an Outdoor Light on Vinyl Siding
Installing an outdoor light on vinyl siding is a straightforward process that can enhance the curb appeal and security of your home. However, it is crucial to follow the correct procedures to avoid damaging the siding or compromising the integrity of the installation. This article will guide you through the steps involved in installing an outdoor light on vinyl siding, ensuring a safe and aesthetically pleasing outcome.
1. Choosing the Right Light Fixture and Location
The first step is to select a suitable light fixture and determine the optimal location for installation. Consider the following factors:
Style and Design:
Choose a fixture that complements the architectural design of your home.Function:
Determine the purpose of the light (e.g., security lighting, accent lighting).Brightness and Light Direction:
Select a fixture with the appropriate lumen output and light direction to meet your needs.Location:
Consider factors such as visibility, proximity to electrical outlets, and potential obstructions.
Once you have chosen a fixture and location, ensure that the area is free of obstacles and that you have access to an electrical outlet.
2. Preparing the Installation Area
Before proceeding with the installation, it is essential to prepare the area and gather the necessary tools. This includes:
Measuring and Marking:
Use a tape measure to determine the precise location for the light fixture and mark the siding with a pencil.Safety Equipment:
Wear safety glasses and gloves to protect yourself from potential hazards.Tools:
Gather the following tools: drill, screwdriver, level, electrical tape, wire strippers, and a stud finder.
Once the area is prepared and the necessary tools are gathered, you can proceed with the installation process.
3. Installing the Mounting Plate
The most critical aspect of installing an outdoor light on vinyl siding is to ensure a secure and damage-free attachment. This involves using a mounting plate specifically designed for vinyl siding. The following steps outline the process:
Locating Studs:
Use a stud finder to locate a stud behind the siding. This provides a solid mounting point for the plate.Drilling Pilot Holes:
Drill pilot holes through the siding at the marked locations for the mounting plate. Use a drill bit slightly smaller than the screws provided with the plate.Installing the Plate:
Align the mounting plate with the pilot holes and secure it to the siding using the screws provided. Ensure the plate is level and flush with the siding.
It is important to note that drilling holes directly into the siding can weaken the material and cause damage. Therefore, using a mounting plate that attaches to a stud behind the siding is essential for a secure and lasting installation.
4. Connecting the Electrical Wires
Once the mounting plate is securely installed, you can connect the electrical wires for the light fixture. This involves the following steps:
Turning Off Power:
Before working with electrical wiring, it is crucial to turn off the power at the circuit breaker for the outlet that will supply the light.Stripping Wires:
Strip the insulation off the ends of the electrical wires from the fixture and the outlet using a wire stripper.Connecting Wires:
Connect the wires according to the color code (e.g., black to black, white to white, ground to green). Use wire connectors and secure them tightly.Electrical Tape:
Wrap electrical tape around each connection to ensure proper insulation.
After connecting the wires, carefully tuck them inside the mounting plate and ensure they are not obstructing the installation of the light fixture.
5. Installing the Light Fixture
With the mounting plate and wiring in place, you can now install the light fixture. This involves the following steps:
Attaching the Fixture:
Align the light fixture with the mounting plate and carefully secure it using the screws provided. Ensure the fixture is level and flush with the siding.Testing the Light:
Turn the power back on at the circuit breaker and test the light to ensure it is working properly.
Once the light fixture is installed and tested, you can admire your new outdoor lighting and enjoy the added functionality and aesthetic appeal it provides to your home.

How To Add A Light Fixture Vinyl Siding Electrical Box Aka J Block

New House Siding How Do I Install Outdoor Lights On This Bracket Doityourself Com Community Forums

Vinyl Siding Lights How To Mount Using A Mounting Block Diy

How To Install An Exterior Light Fixture On Vinyl Siding

How To Install A Porch Light

Replacing An Outdoor Light Fixture

Vinyl Siding Lights How To Mount Using A Mounting Block Installation Blocks

Exterior Light Installation On Vinyl Siding Block

Replacing An Outdoor Light Fixture

Installing Light Fixtures On Vinyl Siding Ehow