How to Install an Outdoor Light Fixture Box
Installing an outdoor light fixture box is crucial for providing safe and functional outdoor lighting. This involves several essential aspects that require careful consideration and execution to ensure a successful installation. This article will delve into the key aspects to focus on when installing an outdoor light fixture box, providing a comprehensive guide for homeowners looking to enhance their exterior lighting.
Location
Selecting the optimal location for your outdoor light fixture box is paramount. Consider factors such as the purpose of the light (e.g., security, ambiance, or task lighting), the desired coverage area, and potential obstacles like trees or other structures. Choose a location that allows for proper clearance and accessibility for maintenance.
Type of Fixture Box
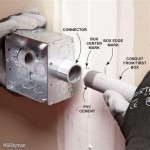
There are various types of outdoor light fixture boxes designed for specific requirements. Non-metallic boxes are commonly used for general applications, while weatherproof boxes offer enhanced protection against moisture and harsh elements. Choose a fixture box that matches the type of fixture you intend to install and meets the electrical code requirements for your area.
Mounting
Securely mounting the light fixture box is essential for stability and longevity. Install the box on a solid surface, such as a wall, fascia board, or eave. Use the appropriate screws or fasteners specified for the material and ensure the box is level and plumb. If necessary, use spacers to adjust the depth of the box.
Wiring
Electrical wiring is a crucial aspect of installing an outdoor light fixture box. Connect the wires from the power source to the fixture box terminals according to the manufacturer's instructions. Use wire nuts or other approved connectors to secure the connections and insulate them with electrical tape. Ensure all connections are tight and comply with electrical codes.
Attachment
Once the wiring is complete, attach the light fixture to the fixture box. Most fixtures have a mounting bracket or plate that connects to the box. Secure the fixture using the provided screws or bolts and tighten them firmly to ensure a secure connection.
Grounding
Proper grounding is essential for safety and prevents electrical hazards. Connect the ground wire from the fixture box to a grounding electrode or grounding wire in accordance with local electrical codes. This provides a path for electrical current to safely discharge in case of a fault.
Final Inspection
After completing the installation, perform a thorough inspection to ensure everything is connected securely. Turn on the power and test the light fixture to verify proper operation. If any issues are detected, refer to the fixture's instructions or consult with a qualified electrician for troubleshooting.
Conclusion
Installing an outdoor light fixture box requires careful consideration and execution of essential aspects such as location, fixture box type, mounting, wiring, attachment, grounding, and final inspection. By following these steps and adhering to electrical codes, homeowners can ensure a safe and functional outdoor lighting system that enhances the aesthetics and security of their property.

How To Install An Exterior Electrical Box For A Light Fixture On The Wood Siding

Replacing An Outdoor Light Fixture
How To Replace An Outdoor Light

Replacing An Outdoor Light Fixture

Replacing An Outdoor Light Fixture
How To Replace An Outdoor Light

Outdoor Light W No Junction Box Lighting Ceiling Exhaust Fan
How To Replace An Outdoor Light

How To Install Outdoor Lighting Fixture From Start Finish
Installing Light On Round Junction Service Box Diy Home Improvement Forum
Related Posts
