How to Install a Sensor Light Outdoor
Installing sensor lights outdoors is a great way to enhance security and convenience. These lights automatically turn on when motion is detected, illuminating dark areas and deterring potential intruders. To ensure proper installation, there are several essential aspects to consider. This article will delve into the key elements of installing a sensor light outdoor, providing a comprehensive guide to help you get the job done right.
Essential Aspects of Installing a Sensor Light Outdoor:
1. Choosing the Right Location:
The location of your sensor light is crucial for its effectiveness. Select an area with adequate coverage of the desired area, such as entryways, walkways, or driveways. Avoid placing the light too close to windows or reflective surfaces, as this can trigger false activations.
2. Determining the Motion Detection Range:
Different sensor lights have different motion detection ranges. Consider the size of the area you want to cover and choose a light with an appropriate range. Ensure the range is not too narrow or too wide to provide optimal coverage without unnecessary activations.
3. Selecting the Appropriate Sensor Type:
There are two main types of sensor lights: passive infrared (PIR) and microwave. PIR sensors detect changes in body heat, while microwave sensors emit electromagnetic waves and detect movement. Choose the sensor type based on your specific needs and the outdoor environment.
4. Setting the Light Duration:
The light duration determines how long the light stays on after motion is detected. Adjust the duration to suit your preference and security needs. Generally, shorter durations are suitable for small areas, while longer durations provide more illumination for larger spaces.
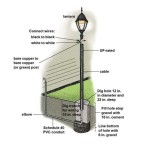
5. Ensuring Proper Electrical Wiring:
Electrical wiring is essential for the proper functioning of the sensor light. Ensure that the wiring is in good condition and meets the electrical code requirements. Use weather-resistant wire connections to prevent damage from moisture or outdoor elements.
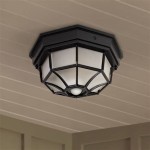
6. Mounting the Light Fixture:
The mounting fixture should securely hold the sensor light in place. Choose a mounting bracket or pole that is compatible with the light and suitable for the location. Ensure that the light is mounted at the desired height for optimal coverage and visibility.
7. Completing the Installation:
Once the light is mounted, connect the electrical wires and secure all connections. Test the light to ensure it is functioning correctly. Make any necessary adjustments to the motion detection range, light duration, or sensor sensitivity to optimize its performance.

How To Install An Outdoor Motion Sensor Light With Pictures

How To Install An Outdoor Motion Sensor Light With Pictures

How To Make A Motion Sensor Light Stay On Rayzeek

Installing A Remote Motion Detector For Lighting Diy

How To Install Motion Sensor Security Floodlight

Motion Sensor Lighting For Elderly Homeowners

Condo Blues How To Install A Solar Security Light

Benefits Of Having Motion Sensor Lights Around Your Home

Motion Sensor Light Location And Best Height

Motion Sensor Lights Tips To Reset Detector
Related Posts