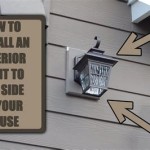
How to Fit Outdoor Wall Lights: A Comprehensive Guide
Outdoor wall lights enhance both the security and aesthetic appeal of a property. Proper installation is crucial to ensure their effectiveness, longevity, and safety. This article provides a detailed guide on how to fit outdoor wall lights, covering essential preparation, installation steps, and crucial safety considerations.
Planning and Preparation
Prior to commencing any installation work, meticulous planning is paramount. This stage encompasses several crucial aspects, including selecting appropriate fixtures, understanding local building codes, and gathering the necessary tools and materials.
The selection of outdoor wall lights should consider several factors. First, the style of the fixture should complement the architectural design of the building. Options range from traditional lantern styles to modern, minimalist designs. Second, the purpose of the lighting must be determined. If the primary goal is security, bright, motion-activated lights might be preferred. For ambient lighting, softer, less intense fixtures are more suitable. Consider the light's IP (Ingress Protection) rating. This rating indicates the fixture's resistance to water and dust. For outdoor applications, a rating of IP44 or higher is generally recommended.
Adherence to local building codes and regulations is non-negotiable. Many jurisdictions have specific requirements regarding the placement, wiring, and type of outdoor lighting allowed. Contacting the local building department or a qualified electrician is advisable to ensure compliance. Failure to comply with these regulations can result in fines or the need to remove the installed fixtures.
Gathering the appropriate tools and materials before starting the installation process streamlines the workflow and minimizes potential delays. Essential tools include a voltage tester, wire stripper, wire connectors, a drill with various drill bits, a screwdriver set (including both Phillips head and flathead), a level, a measuring tape, and safety glasses. Necessary materials include the selected outdoor wall lights, weatherproof electrical boxes, appropriate wiring (rated for outdoor use), conduit (if required by local codes or for added protection), mounting screws, silicone sealant, and a ladder if working at height.
Safety is paramount when working with electricity. Before starting any electrical work, it is imperative to disconnect the power supply to the circuit at the main breaker panel. Verify that the power is off using a voltage tester at the intended wiring location. Never assume the power is off simply because a switch is in the "off" position.
Installation Process: Step-by-Step Guide
The installation process involves several distinct steps, starting with preparing the mounting surface, then wiring the fixture, and finally securing it in place. Accuracy and attention to detail at each stage are crucial for a successful and safe installation.
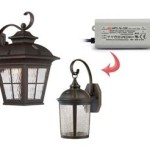
The first step involves preparing the mounting surface. This typically entails installing a weatherproof electrical box at the designated location. The box should be securely attached to a solid structure, such as a wall stud or a mounting block. If the existing wiring is not already routed to the location, it will need to be run through conduit (if required) and into the electrical box. Ensure that the electrical box is properly grounded.
Next, prepare the wiring for connection. Using a wire stripper, carefully remove a small amount of insulation from the ends of the wires on both the fixture and the existing wiring in the electrical box. Typically, there will be three wires: a black (hot) wire, a white (neutral) wire, and a green or bare copper (ground) wire. Connect the corresponding wires using wire connectors, ensuring a secure and tight connection. Confirm that no bare wire is exposed. Following local regulations and the manufacturer's instructions, connect the ground wire to the grounding screw inside the electrical box or to the designated ground terminal. Incorrectly connecting wires can lead to short circuits, electrical fires, or damage to the lighting fixture.
After the wiring is complete, carefully tuck the wires into the electrical box, ensuring they are not pinched or stressed. Position the mounting plate of the outdoor wall light over the electrical box and align the mounting holes. Secure the mounting plate to the electrical box using the screws provided, ensuring it is level and flush with the wall. Attach the light fixture to the mounting plate, following the manufacturer's instructions. The fixture should fit snugly and securely against the wall. Use a level to ensure that the light is perfectly vertical before fully tightening the mounting screws.
To prevent water from entering the electrical box behind the fixture, apply a bead of weatherproof silicone sealant around the perimeter of the mounting plate where it meets the wall. This will create a watertight seal and protect the electrical connections from moisture. Smooth the sealant with a finger or a damp cloth for a clean and professional finish.
Finally, install the light bulb according to the fixture's specifications. Ensure that the bulb is the correct type and wattage. Once the bulb is installed, carefully attach any decorative covers or lenses that came with the fixture. These covers often provide additional protection from the elements and enhance the aesthetic appearance of the light.
Testing and Troubleshooting
After installation, it is essential to thoroughly test the fixture and address any potential issues. This step ensures that the lighting system is functioning correctly and safely.
Restore power to the circuit at the main breaker panel. Turn on the outdoor wall light to verify that it illuminates correctly. If the light does not turn on, double-check the wiring connections inside the electrical box to ensure they are secure and properly connected. Use a voltage tester to confirm that power is reaching the light fixture. If the light still does not work, the bulb might be faulty and need replacing.
If the light flickers or dims intermittently, this could indicate a loose wiring connection or a problem with the circuit. Carefully inspect all the wiring connections and tighten any loose connections. If the problem persists, it may be necessary to consult with a qualified electrician to diagnose and repair the underlying issue.
If the outdoor wall light has a motion sensor, test the sensor to ensure it is functioning correctly. Adjust the sensitivity and range settings according to the manufacturer's instructions. Walk within the sensor's range to trigger the light and verify that it turns on automatically. Also, ensure that the sensor is not obstructed by any objects, such as tree branches or bushes, which could interfere with its operation.
Regular maintenance of outdoor wall lights is essential for their longevity and optimal performance. Periodically clean the fixtures to remove dirt, debris, and cobwebs. Inspect the wiring and connections for any signs of damage or corrosion. Replace any damaged wiring or components promptly. Check the silicone sealant around the mounting plate and reapply if necessary to maintain a watertight seal.
When replacing light bulbs, always disconnect the power to the fixture at the breaker panel to prevent electric shock. Use a ladder to safely reach the light fixture. Wear gloves when handling light bulbs to protect your hands. Dispose of old light bulbs properly according to local regulations.
If any issues arise that cannot be resolved through basic troubleshooting, it is always best to contact a qualified electrician. Attempting to perform complex electrical repairs without the proper training and experience can be dangerous and may violate local building codes.
By following these guidelines, individuals can install outdoor wall lights safely and effectively, enhancing the security and aesthetic appeal of their properties.

How To Install Outdoor Wall Lighting Light Fixtures Mr Electric

Installing An Exterior Wall Light Step By Guide And

How To Install Outdoor Wall Lights

How To Install A Sconce Outdoors Bob Vila

How To Install Outdoor Wall Lighting For Home Improvement

Outdoor Light Easy Installation Without Touching The House Electrics

Ultimate Guide To Outdoor Wall Lights Gama Sonic

Top Tips Replacing An Outdoor Wall Sconce Porch Daydreamer

How To Install Low Voltage Fence Lights In Lite Outdoor Lighting

Home Luminaire Spence 1 Light White Outdoor Wall Lantern Sconce With Seeded Glass And Built In Gfci S 31856 The Depot
Related Posts