How To Change a Bulb In an Outdoor Sconce
Changing a light bulb in an outdoor sconce may seem like a simple task, but taking the proper precautions and following the correct steps ensures safety and prevents damage to the fixture and the new bulb. This guide provides a comprehensive walkthrough of the process.
Safety First
Before beginning any electrical work, safety should be the top priority. Taking a few precautionary measures can prevent accidents.
Key Points:
- Turn off the Power: Locate the circuit breaker that controls the sconce's power and switch it off. This is the most crucial step to prevent electric shock.
- Verify Power Off: Use a non-contact voltage tester to double-check that the power to the sconce is indeed off. Touch the tester to the wires inside the sconce. If the tester lights up or beeps, the power is still on.
- Use Insulated Tools: When working with electrical fixtures, always use tools with insulated handles to further minimize the risk of shock.
- Dry Conditions: Ensure your hands and the surrounding area are dry before starting the process. Water conducts electricity, significantly increasing the risk of electric shock.
Identify the Bulb Type
Outdoor sconces utilize various bulb types, each requiring a specific replacement. Identifying the correct bulb is essential for proper function and to avoid damage to the fixture.
Key Points:
- Check the Old Bulb: Carefully examine the old bulb for markings indicating its type (e.g., incandescent, halogen, CFL, LED). Note the wattage and voltage as well.
- Consult the Fixture Manual: If the old bulb lacks markings, refer to the sconce's user manual. It should list the recommended bulb specifications.
- Take the Old Bulb to the Store: If you're unsure about the bulb type, take the old one to a hardware or lighting store for assistance in finding the correct replacement.
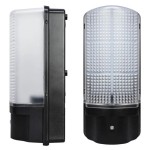
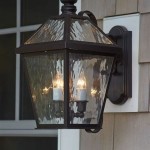
Accessing the Bulb
Outdoor sconce designs vary, and accessing the bulb can differ depending on the model. Understanding the common methods is important.
Key Points:
- Removing the Cover: Some sconces have a glass or plastic cover that needs to be removed first. This might involve unscrewing a finial, loosening thumbscrews, or unclipping the cover.
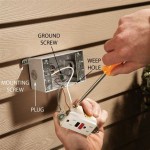
- Dealing with Screws: Other sconces have screws holding the fixture to the wall. These screws might be hidden beneath decorative elements. Carefully examine the sconce to locate and remove them.
Removing the Old Bulb
With the sconce open and the power off, the next step is to carefully remove the old bulb.
Key Points:
- Gentle Handling: Grasp the old bulb firmly but gently. Avoid excessive force, which could break the bulb and cause injury.
- Twisting Motion: Most bulbs are removed by twisting them counterclockwise. If the bulb is stuck, try wearing gloves for a better grip. Do not pull on the bulb.
- Base Types: Be aware that some bulbs, like bayonet mounts, require a push-and-twist motion for removal. Refer to the sconce's manual if unsure.
- Disposal: Dispose of the old bulb safely. If it's a CFL or other bulb containing mercury, follow local guidelines for proper disposal.
Installing the New Bulb
Once the old bulb is removed, the new one can be installed.
Key Points:
- Matching the Base: Ensure the new bulb's base matches the sconce's socket. Trying to force a mismatched bulb can damage the socket.
- Gentle Insertion: Align the pins or threads of the new bulb with the socket and gently twist it clockwise until secure. Avoid overtightening.
- Avoid Touching the Glass: With halogen and some other bulbs, avoid touching the glass with bare fingers. The oils from your skin can reduce the bulb's lifespan.
Reassembling the Sconce
After installing the new bulb, the final step is to put the sconce back together.
Key Points:
- Reverse Order: Follow the reverse order of the disassembly process. Reattach any covers, screws, or decorative elements.
- Secure Fasteners: Ensure all screws and fasteners are properly tightened to secure the sconce and prevent any rattling.
Testing the New Bulb
With the sconce reassembled, it's time to test the new bulb.
Key Points:
- Restore Power: Turn the circuit breaker back on.
- Check Functionality: Switch on the sconce to verify the new bulb is working correctly.

How To Change An Outdoor Porch Lantern Sconce Light Bulb Simple Diy Do It Yourself Procedure Hq

How To Change An Outdoor Porch Lantern Sconce Light Bulb Simple Diy Do It Yourself Procedure Hq

How To Change An Outdoor Porch Lantern Sconce Light Bulb Simple Diy Do It Yourself Procedure Hq

How To Change Your Outside Light Bulb

How To Change An Outside Light Bulb Quick And Easy

Can Anyone Help Me Open This Outdoor Wall Fixture To Change The Bulbs

How To Change An Outside Light Bulb Quick And Easy

Replacing An Outdoor Light Fixture

How To Change Porch Light Bulb 7 Quick Easy Steps

How To Change A Lamp Post Light Bulb Heartland Homes