How to Adjust Outdoor Light Sensors
Outdoor light sensors, also known as photocells, play an essential role in providing automatic illumination when needed. They detect changes in ambient light levels, triggering lights to switch on during darkness and off during daylight hours. However, occasionally, these sensors may require adjustment to ensure they operate optimally for your specific needs. This article will guide you through the process of adjusting outdoor light sensors, outlining key steps and considerations.
Understanding Light Sensor Types and Settings
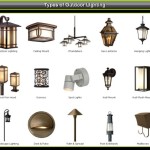
Outdoor light sensors come in various types, each with its own adjustment capabilities. The most common types are:
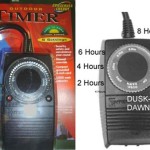
- Dusk-to-Dawn Sensors: These sensors are designed to switch lights on at dusk and off at dawn, providing illumination throughout nighttime hours.
- Adjustable Time Delay Sensors: These sensors allow you to set a specific duration for which lights remain on after being triggered. For example, you can set lights to stay on for five minutes after motion is detected.
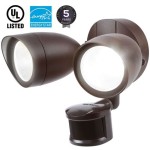
- Motion-Activated Sensors: These sensors only turn on lights when motion is detected, conserving energy by only illuminating areas when needed.
Before attempting any adjustments, it's crucial to identify the specific type of sensor you have and familiarize yourself with its settings. Consult the manufacturer's instructions or user manual for detailed information. Different sensors may have variations in their adjustment mechanisms and available options.
Adjusting the Light Sensitivity Threshold
One of the most common adjustments on outdoor light sensors is the light sensitivity threshold. This setting determines the level of ambient light at which the sensor triggers the lights to turn on.
To adjust the light sensitivity:
- Locate the Adjustment Knob or Dial: Most light sensors have a knob or dial labeled "sensitivity" or "lux." Turn the knob clockwise to increase the sensitivity and counterclockwise to decrease it.
- Observe the Light Output: As you adjust the sensitivity, pay attention to the lights' behavior. Increasing the sensitivity will cause the lights to switch on at higher light levels, effectively extending the duration they remain on. Conversely, reducing sensitivity will make the lights turn on only during darker periods.
- Fine-Tune the Setting: Experiment with different sensitivity levels until you achieve the desired illumination pattern. Consider factors such as the surrounding environment, desired illumination time, and potential for nuisance triggering.
It's important to note that adjusting the sensitivity may affect the sensor's ability to detect changes in light accurately, especially if the ambient light conditions are consistent. In areas with significant variations in light levels, you may need to adjust the sensitivity more frequently.
Setting the Time Delay for Adjustable Sensors
For adjustable time delay sensors, you can configure the duration for which lights remain on after being triggered.
To adjust the time delay:
- Identify the Time Delay Setting: The sensor will usually have a knob, dial, or switch specifically labeled "time delay" or "duration."
- Select the Desired Time Setting: Most time delay sensors offer options ranging from a few seconds to several minutes. Rotate the adjustment mechanism to select the appropriate duration.
- Test the Setting: After making the adjustment, trigger the sensor (e.g., walk in front of a motion-activated sensor) to confirm the lights turn on for the desired duration.
Choosing an appropriate time delay is crucial for balancing energy efficiency and the level of illumination required. Shorter time delays are suitable for applications where brief illumination is sufficient, while longer durations are better for areas requiring extended lighting.
Troubleshooting and Maintenance
Over time, outdoor light sensors can become dirty or malfunctioning, requiring cleaning or repairs. Here are some common issues and solutions:
- Dirty Sensor: Dirt and debris can obstruct the sensor's light detection capabilities. Regularly clean the sensor lens with a soft cloth to ensure optimal performance.
- Malfunctioning Sensor: If the sensor is not responding properly, it may be faulty. Check the sensor's wiring and connections for any loose or broken wires. If the issue persists, contact a qualified electrician or the manufacturer for assistance.
- Environmental Factors: Extreme weather conditions, such as heavy rain or snow, can affect the sensor's operation. Ensure the sensor is properly protected from the elements and consider using a weatherproof cover if necessary.
By following these guidelines, you can adjust outdoor light sensors to optimize their performance and achieve the desired illumination levels for your outdoor spaces.

How To Alter The Settings On Your Pir Floodlight Security Light Sensor

Motion Sensor Lights Tips To Reset Detector

120 Led Solar Security Light Black Spv Lights

How To Reset A Motion Sensor Light Lighting And Ceiling Fans The Home Depot

How To Install An Outdoor Motion Sensor Light With Pictures

How To Reset A Motion Sensor Light Lighting And Ceiling Fans The Home Depot

How To Adjust Motion Light Sensor Settings The Home Depot

How To Adjust Security Lights Lighting And Ceiling Fans The Home Depot

Emaner Outdoor Security Floodlight Waterproof Remote Control Motion Sensor Dusk To Dawn Stay On Brightness Adjust Tunable White 280w Equiv 120v Light For Yard Patio Porch 2pack Yahoo Ping

My Outdoor Security Light Won T Turn Off George Brazil Plumbing Electrical Phoenix Az
Related Posts