Essential Aspects of Connecting Low Voltage Outdoor Lighting
Installing low voltage outdoor lighting can greatly enhance the ambiance and security of your outdoor space. However, it's crucial to approach this task with the proper knowledge and techniques to ensure a safe and effective installation. Here, we delve into the essential aspects that will guide you through the process of connecting low voltage outdoor lighting.
Planning and Layout
Before any installation work begins, it's imperative to plan your lighting layout carefully. Determine the areas that require illumination, the type and number of fixtures needed, and the placement of the transformer. A well-planned layout will ensure optimal light distribution and minimize unnecessary cable clutter.
Choosing the Right Transformer
The transformer is the heart of your low voltage lighting system, converting the standard household voltage to a safer low voltage for your outdoor lights. Select a transformer with a wattage capacity sufficient to handle the total wattage of your connected fixtures. Additionally, consider the location of the transformer for easy access and protection from the elements.
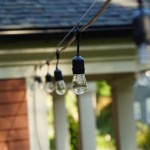
Selecting Lighting Fixtures
Choose outdoor lighting fixtures that are specifically designed for low voltage applications. These fixtures are typically weather-resistant and available in a wide range of styles to complement your outdoor decor. Consider the beam angle, color temperature, and brightness of each fixture to create the desired lighting effect.
Wiring and Connections
Low voltage lighting systems typically use two-wire cables. Connect the positive wire from the transformer to the positive terminal on the light fixture and the negative wire to the negative terminal. Ensure secure connections using waterproof connectors to prevent moisture-related issues.
Burying the Cables
To minimize tripping hazards and maintain a clean appearance, bury the cables underground. Use a trenching tool to create shallow trenches and carefully lay the cables inside. Protect the cables from mechanical damage by placing them in a conduit or using cable burial tape.
Testing and Troubleshooting
Once the installation is complete, test the lighting system to ensure it's functioning properly. Inspect each fixture for proper illumination and check for any loose connections. If any issues arise, refer to the manufacturer's instructions for troubleshooting guidance.
By adhering to these essential aspects, you can confidently connect your low voltage outdoor lighting, creating a safe and inviting outdoor environment. From planning the layout to testing and troubleshooting, understanding the intricacies of this process will ensure a successful and enjoyable lighting experience.

How To Make A Low Voltage Lighting Connection

Choosing Low Voltage Lighting Transformers Cable And Wire Connectors In Lite Outdoor

The Easiest Way To Install Low Voltage Landscape Lighting Abby Organizes

How To Install Low Voltage Outdoor Landscape Lighting The Garden Glove

3 Must Haves For Installing Low Voltage Landscape Lighting Ideas Advice Lamps Plus

How To Install Low Voltage Outdoor Landscape Lighting

Replacing Landscape Lighting Quick Connectors Porch Daydreamer

How Outdoor Landscape Lighting Low Voltage Connectors Work By Total

Sd Connect Landscape Lighting Connector

The Easiest Way To Install Low Voltage Landscape Lighting Abby Organizes
Related Posts